在技术进步的过程中,往往是因为新的技术比老的使用操作更方便,或是性能更优。
简介 来自官网:
MyBatis 是一款优秀的持久层框架,它支持定制化 SQL、存储过程以及高级映射。MyBatis 避免了几乎所有的 JDBC 代码和手动设置参数以及获取结果集。MyBatis 可以使用简单的 XML 或注解来配置和映射原生类型、接口和 Java 的 POJO(Plain Old Java Objects,普通老式 Java 对象)为数据库中的记录。
说一下 :Mybatis官网对于英语不好的工程师来说很友好,因为它是为数不多的有中文文档的技术官网。
JDBC VS Mybatis 使用JDBC操作数据库 DBUtils:
1 2 3 4 5 6 7 8 9 10 11 12 13 14 15 16 17 18 19 20 21 22 23 24 25 26 27 28 29 30 31 32 33 34 35 36 37 38 39 40 41 42 43 44 45 46 47 48 49 50 51 52 53 54 55 56 57 58 59 60 61 62 63 64 65 66 67 68 69 70 71 72 73 74 75 76 77 78 79 80 81 82 83 84 85 86 87 88 89 90 91 92 93 94 95 96 97 98 99 public class DBUtils private static final String username = "root" ; private static final String password = "root" ; private static final String driverClassName = "com.mysql.jdbc.Driver" ; private static final String dbUrl = "jdbc:mysql://120.79.167.xxx:3306/mybatis ?useUnicode=true &characterEncoding=UTF-8 &allowMultiQueries=true &autoReconnect=true &useSSL=false" ; public static List<User> findUsersByUsername (String name) List<User> users = new ArrayList<>(); Connection connection = null ; PreparedStatement statement = null ; ResultSet resultSet = null ; try { Class.forName(driverClassName); connection = DriverManager.getConnection(dbUrl, username, password); String sql = " select * from tb_user where username = ? " ; statement = connection.prepareStatement(sql); statement.setString(1 ,name); resultSet = statement.executeQuery(); while (resultSet.next()){ User user = new User(); user.setId(resultSet.getInt("id" )); user.setUserId(resultSet.getString("user_id" )); user.setUsername(resultSet.getString("username" )); user.setPassword(resultSet.getString("password" )); user.setEmail(resultSet.getString("email" )); user.setPhone(resultSet.getString("phone" )); user.setGender(resultSet.getInt("gender" )); user.setBirthday(resultSet.getTime("birthday" )); user.setStatus(resultSet.getInt("status" )); user.setCreateTime(resultSet.getTimestamp("create_time" )); user.setCreateUser(resultSet.getString("create_user" )); user.setModifyTime(resultSet.getTimestamp("modify_time" )); user.setModifyUser(resultSet.getString("modify_user" )); users.add(user); } } catch (ClassNotFoundException | SQLException e) { e.printStackTrace(); } finally { try { if (connection != null ){ connection.close(); } } catch (SQLException e) { e.printStackTrace(); } try { if (statement != null ){ statement.close(); } } catch (SQLException e) { e.printStackTrace(); } try { if (resultSet != null ){ resultSet.close(); } } catch (SQLException e) { e.printStackTrace(); } } return users; } public static void main (String[] args) List<User> users = DBUtils.findUsersByUsername("admin" ); System.out.println(users); } }
使用Mybatis操作数据库 Mapper接口的方法:
1 List<User> findUsersByUsername (String username) ;
Mapper.xml文件的SQL:
1 2 3 4 5 6 7 8 9 10 11 12 13 14 <sql id ="Base_Column_List" > id, user_id, username, password, email, phone, gender, birthday, status, create_time, create_user, modify_time, modify_user </sql > <select id ="findUsersByUsername" resultType ="user" > select <include refid ="Base_Column_List" /> from tb_user <where > username = #{username} </where > </select >
以上代码除去Mybatis的配置文件外,上面仅仅几行就可以实现JDBC几十行代码可以实现的效果。
Mybatis的配置文件:
1
2
3
4
5
6
7
8
9
10
11
12
13
14
15
16
17
18
19
20
21
22
23
24
25
26
27
28
29
30
31
32
33
34
35
36
37
38
39
40
41
42
43
44
45
46
47
48
49
50
51
<?xml version="1.0" encoding="UTF-8"?> <!DOCTYPE configuration PUBLIC "-//mybatis.org//DTD Config 3.0//EN" "http://mybatis.org/dtd/mybatis-3-config.dtd" > <configuration > <properties resource ="mybatis.properties" > <property name ="username" value ="root" /> </properties > <settings > <setting name ="mapUnderscoreToCamelCase" value ="true" /> <setting name ="logPrefix" value ="##Mybatis##" /> <setting name ="logImpl" value ="STDOUT_LOGGING" /> </settings > <typeAliases > <package name ="com.ooyhao.mybatis.bean" /> </typeAliases > <environments default ="development" > <environment id ="development" > <transactionManager type ="JDBC" /> <dataSource type ="POOLED" > <property name ="driver" value ="${jdbc.driver}" /> <property name ="url" value ="${jdbc.url}" /> <property name ="username" value ="${jdbc.username}" /> <property name ="password" value ="${jdbc.password}" /> </dataSource > </environment > </environments > <mappers > <mapper resource ="mapper/UserMapper.xml" /> </mappers > </configuration >
mybatis.properties:
1
2
3
4
5
jdbc.driver = com.mysql.jdbc.Driver jdbc.url = jdbc:mysql://120.79.167.88:3306/mybatis ?useUnicode =true&characterEncoding=UTF-8&allowMultiQueries=true&autoReconnect=true&useSSL=false jdbc.username = root jdbc.password = root
测试:
1
2
3
4
5
6
7
8
9
10
11
12
13
14
15
16
17
18
19
20
public TestDemo{ SqlSession sqlSession = null ; @Before public void init () String resource = "mybatis-configuration.xml" ; InputStream inputStream = RoleTest.class .getClassLoader ().getResourceAsStream (resource ) ; SqlSessionFactory build = new SqlSessionFactoryBuilder().build(inputStream); sqlSession = build.openSession(true ); } @Test public void testFindUsersByUsername () String username = "admin" ; UserMapper mapper = sqlSession.getMapper(UserMapper.class ) ; List<User> userList = mapper.findUsersByUsername(username); System.out.println(userList); sqlSession.close(); } }
我们可以看一下测试类:我们通过SqlSessionFactoryBuilder的build方法,结合Mybatis的全局配置文件创建出SqlSessionFactory,再利用SqlSessionFactory通过openSession方法创建一个SqlSession。然后通过SqlSession来操作SQL。
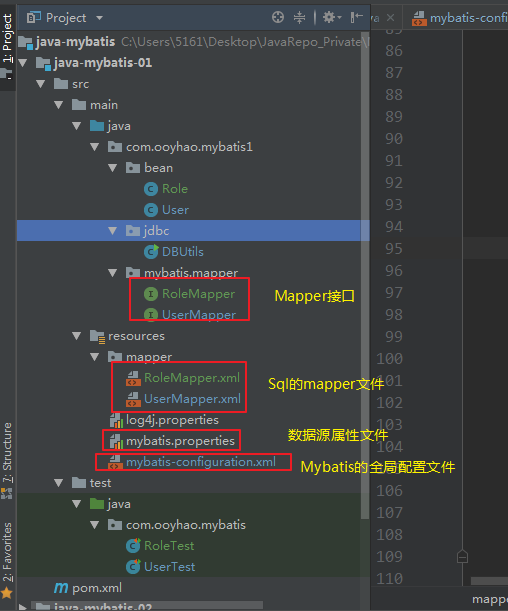
看一下项目结构:
SqlSession执行SQL 操作步骤
需要在对应的mapper文件中添加相关的sql配置。
获得配置文件的路径并通过Resources的getResourceAsStream/AsReader方法获取流
InputStream getResourceAsStream(String resource) 返回值为字节流
Reader getResourceAsReader(String resource) 返回值为字符流
通过SqlSessionFactoryBuilder创建对象
使用SqlSessionFactoryBuilder对象的build(Stream/Reader)方法创建SqlSessionFactory对象。
通过SQLSessionFactory对象的openSession方法创建一个SqlSession对象
通过SQLSession对象的相关方法进行对数据库的crud操作。
增删改时需要提交事务。
上面已经进行了数据库操作,我们再回头看一下是不是这样的步骤:
1
2
3
4
5
6
7
8
9
10
11
12
13
14
15
16
17
18
19
20
21
22
@Test public void testFindUsersByUsername () String resource = "mybatis-configuration.xml" ; InputStream inputStream = RoleTest.class .getClassLoader ().getResourceAsStream (resource ) ; SqlSessionFactory build = new SqlSessionFactoryBuilder().build(inputStream); sqlSession = build.openSession(true ); String username = "admin" ; UserMapper mapper = sqlSession.getMapper(UserMapper.class ) ; List<User> userList = mapper.findUsersByUsername(username); System.out.println(userList); sqlSession.close(); }
我们通过SqlSession指定Sql的有下列几种方式:
方式1 使用SqlSession直接通过namespace.id的形式操作xml:
1
2
3
4
5
6
7
8
9
10
11
12
13
14
15
16
<?xml version="1.0" encoding="UTF-8" ?> <!DOCTYPE mapper PUBLIC "-//mybatis.org//DTD Mapper 3.0//EN" "http://mybatis.org/dtd/mybatis-3-mapper.dtd" > <mapper namespace ="com.ooyhao.mybatis1.mybatis.mapper.UserMapper" > <select id ="findUsersByUsername" resultType ="user" > select <include refid ="Base_Column_List" /> from tb_user <where > username = #{username} </where > </select > </mapper >
测试方法:
1
2
3
4
5
6
7
8
9
@Test public void testMybatisFindUsersByUsernameXML () String username = "admin" ; List<User> list = sqlSession.selectList ("com.ooyhao.mybatis1.mybatis.mapper.UserMapper.findUsersByUsername" , username); System.out.println(list); sqlSession.close(); }
提示 :com.ooyhao.mybatis1.mybatis.mapper.UserMapper是xml配置文件的namespace。findUsersByUsername是sql的id。
方式2 使用Mapper接口结合注解的方式来执行SQL:
1
2
@Select (" select * from tb_user where username = #{value} " )List<User> findUsersByUsername (String username) ;
测试方法:
1
2
3
4
5
6
7
8
9
@Test public void testFindUsersByUsername () String username = "admin" ; UserMapper mapper = sqlSession.getMapper(UserMapper.class ) ; List<User> userList = mapper.findUsersByUsername(username); System.out.println(userList); sqlSession.close(); }
提示 :这种方式通过在接口方法上使用注解,来替代在xml文件中的SQL,简单sql可以使用注解。
方式3 使用Mapper接口和XML文件关联来查询SQL并执行:
Mapper接口:
1 List<User> findUsersByUsername (String username) ;
Xml文件:
1
2
3
4
5
6
7
8
9
10
11
12
13
14
15
16
<?xml version="1.0" encoding="UTF-8" ?> <!DOCTYPE mapper PUBLIC "-//mybatis.org//DTD Mapper 3.0//EN" "http://mybatis.org/dtd/mybatis-3-mapper.dtd" > <mapper namespace ="com.ooyhao.mybatis1.mybatis.mapper.UserMapper" > <select id ="findUsersByUsername" resultType ="user" > select <include refid ="Base_Column_List" /> from tb_user <where > username = #{username} </where > </select > </mapper >
单元测试方法:
1
2
3
4
5
6
7
8
9
@Test public void testFindUsersByUsername () String username = "admin" ; UserMapper mapper = sqlSession.getMapper(UserMapper.class ) ; List<User> userList = mapper.findUsersByUsername(username); System.out.println(userList); sqlSession.close(); }
这种情况后面使用最多,但是有一些需要遵循的规则:
1
2
3
4
5
6
7
8
9
10
11
//遵循四个原则 1、Mapper.xml文件中的namespace与mapper接口的类路径相同。 2、Mapper接口方法名和Mapper.xml中定义的每个statement的id相同 3、Mapper接口方法的输入参数类型和mapper.xml中定义的每个sql 的parameterType的类型相同 4、Mapper接口方法的输出参数类型和mapper.xml中定义的每个sql的resultType的类型相同 mapper动态代理 Mapper接口开发方法只需要程序员编写Mapper接口(相当于Dao接口),由Mybatis框架根据接口定义创建接口的动态代理对象,代理对象的方法体同上边Dao接口实现类方法。 mybatis官方推荐使用mapper代理方法开发mapper接口,程序员不用编写mapper接口实现类,使用mapper代理方法时,输入参数可以使用pojo包装对象或map对象,保证dao的通用性。
完整的Mybatis案例 完整的配置文件 1 2 3 4 5 6 7 8 9 10 11 12 13 14 15 16 17 18 19 20 21 22 23 24 25 26 27 28 29 30 31 32 33 34 35 36 37 38 39 40 41 42 43 44 45 46 47 48 49 50 51 52 53 54 55 56 <?xml version="1.0" encoding="UTF-8" ?> <!DOCTYPE configuration PUBLIC "-//mybatis.org//DTD Config 3.0//EN" "http://mybatis.org/dtd/mybatis-3-config.dtd" > <configuration > <properties resource ="mybatis.properties" > </properties > <settings > <setting name ="mapUnderscoreToCamelCase" value ="true" /> <setting name ="logPrefix" value ="##Mybatis##" /> <setting name ="logImpl" value ="STDOUT_LOGGING" /> </settings > <typeAliases > <package name ="com.ooyhao.mybatis3.bean" /> </typeAliases > <environments default ="development" > <environment id ="development" > <transactionManager type ="JDBC" /> <dataSource type ="POOLED" > <property name ="driver" value ="${jdbc.driver}" /> <property name ="url" value ="${jdbc.url}" /> <property name ="username" value ="${jdbc.username}" /> <property name ="password" value ="${jdbc.password}" /> </dataSource > </environment > </environments > <mappers > <mapper resource ="mapper/UserMapper.xml" /> <mapper resource ="mapper/RoleMapper.xml" /> <mapper resource ="mapper/VehicleMapper.xml" /> </mappers > </configuration >
配置文件解析 【通过properties 的resource属性引入properties文件】
1 2 <properties resource ="mybatis.properties" > </properties >
【延迟加载技术】
1 2 3 4 5 6 7 8 9 10 <settings > <setting name ="mapUnderscoreToCamelCase" value ="true" /> <setting name ="logImpl" value ="STDOUT_LOGGING" /> <setting name ="lazyLoadingEnabled" value ="true" /> <setting name ="aggressiveLazyLoading" value ="false" /> </settings >
【包别名】
1 2 3 4 5 6 7 <typeAliases > <package name ="com.ooyhao.mybatis3.bean" /> </typeAliases >
【配置数据库信息】(要根据自己的环境来设置)
1 2 3 4 5 6 7 8 9 10 11 12 13 14 15 <environments default ="development" > <environment id ="development" > <transactionManager type ="JDBC" /> <dataSource type ="POOLED" > <property name ="driver" value ="${jdbc.driver}" /> <property name ="url" value ="${jdbc.url}" /> <property name ="username" value ="${jdbc.username}" /> <property name ="password" value ="${jdbc.password}" /> </dataSource > </environment > </environments >
【通过在mapper标签中引入mapper文件】
(一定要注意每新创建一个mapper文件需要在配置文件中配置)
1 2 3 4 5 6 7 <mappers > <mapper resource ="mapper/UserMapper.xml" /> <mapper resource ="mapper/RoleMapper.xml" /> <mapper resource ="mapper/VehicleMapper.xml" /> </mappers >
properties属性文件 1 2 3 4 5 6 jdbc.driver = com.mysql.jdbc.Driver jdbc.url = jdbc:mysql://120.79.167.xxx:3306/mybatis ?useUnicode =true&characterEncoding=UTF-8 &allowMultiQueries =true&autoReconnect=true&useSSL=false jdbc.username = root jdbc.password = root
UserMapper接口文件 1 2 3 public interface UserMapper User findUserWithRolesByUserId (Integer id) ; }
UserMapper.xml接口文件 1 2 3 4 5 6 7 8 9 10 11 12 13 14 15 16 17 18 19 20 21 22 23 24 25 26 27 28 29 30 31 32 33 34 35 36 37 38 39 40 41 42 43 44 45 46 47 48 49 <?xml version="1.0" encoding="UTF-8" ?> <!DOCTYPE mapper PUBLIC "-//mybatis.org//DTD Mapper 3.0//EN" "http://mybatis.org/dtd/mybatis-3-mapper.dtd" > <mapper namespace ="com.ooyhao.mybatis3.mapper.UserMapper" > <resultMap id ="BaseResultWithRole" type ="com.ooyhao.mybatis3.bean.User" > <id column ="id" jdbcType ="INTEGER" property ="id" /> <result column ="user_id" jdbcType ="VARCHAR" property ="userId" /> <result column ="username" jdbcType ="VARCHAR" property ="username" /> <result column ="password" jdbcType ="VARCHAR" property ="password" /> <result column ="email" jdbcType ="VARCHAR" property ="email" /> <result column ="phone" jdbcType ="VARCHAR" property ="phone" /> <result column ="gender" jdbcType ="INTEGER" property ="gender" /> <result column ="birthday" jdbcType ="DATE" property ="birthday" /> <result column ="status" jdbcType ="INTEGER" property ="status" /> <result column ="create_time" jdbcType ="TIMESTAMP" property ="createTime" /> <result column ="create_user" jdbcType ="VARCHAR" property ="createUser" /> <result column ="modify_time" jdbcType ="TIMESTAMP" property ="modifyTime" /> <result column ="modify_user" jdbcType ="VARCHAR" property ="modifyUser" /> <collection property ="roles" ofType ="role" column ="id" select ="selectRole" /> </resultMap > <resultMap id ="selectRole" type ="role" > <id column ="cid" jdbcType ="INTEGER" property ="id" /> <result column ="role_name" jdbcType ="VARCHAR" property ="roleName" /> <result column ="description" jdbcType ="VARCHAR" property ="description" /> <result column ="status" jdbcType ="INTEGER" property ="status" /> <result column ="create_time" jdbcType ="TIMESTAMP" property ="createTime" /> <result column ="create_user" jdbcType ="VARCHAR" property ="createUser" /> <result column ="modify_time" jdbcType ="TIMESTAMP" property ="modifyTime" /> <result column ="modify_user" jdbcType ="VARCHAR" property ="modifyUser" /> </resultMap > <select id ="findUserWithRolesByUserId" resultMap ="BaseResultWithRole" > select a.id,a.user_id,a.username,a.password,a.email,a.phone,a.gender, a.birthday,a.status,a.create_time,a.create_user,a.modify_time,a.create_user from tb_user a where a.id = #{id} </select > <select id ="selectRole" resultType ="role" > select b.* from tb_user_role a left join tb_role b on a.role_id = b.id where a.user_id = #{id} </select > </mapper >
单元测试 1 2 3 4 5 6 7 8 9 10 11 12 13 14 15 16 17 18 19 20 21 public class UserTest SqlSession sqlSession = null ; @Before public void init () String resource = "mybatis-configuration.xml" ; InputStream inputStream = UserTest.class .getClassLoader ().getResourceAsStream (resource ) ; sqlSession = new SqlSessionFactoryBuilder().build(inputStream).openSession(true ); } @Test public void findUserWithRolesByUserId () UserMapper mapper = sqlSession.getMapper(UserMapper.class ) ; User user = mapper.findUserWithRolesByUserId(1 ); System.out.println(JSONObject.toJSONString(user)); sqlSession.close(); } }
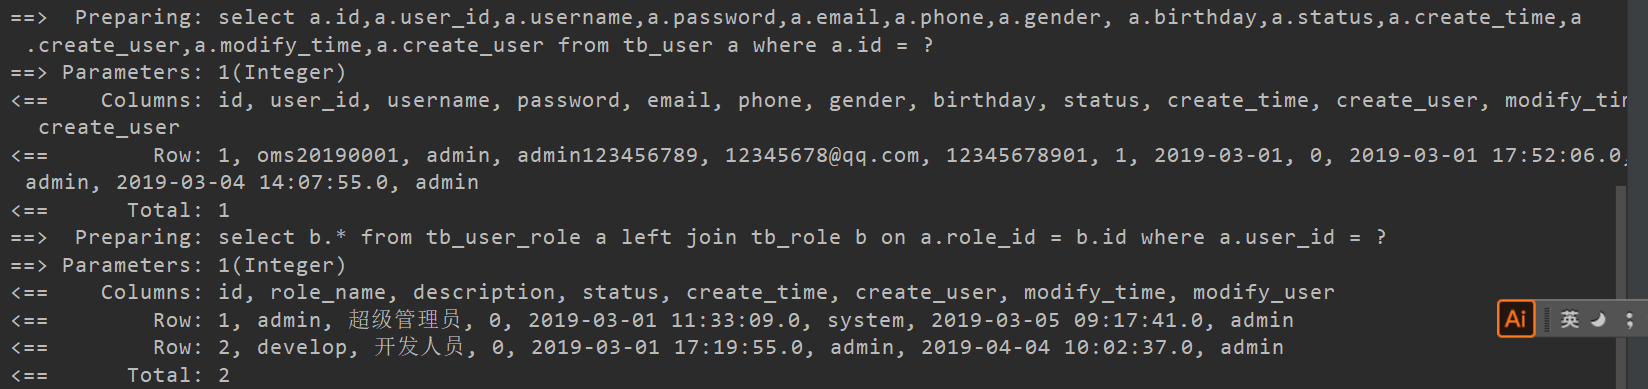
测试结果
总结 这一节仅仅通过JDBC和Mybatis的操作比较,来引出Mybatis,初一看,可能会觉得Mybatis配置文件很繁琐,但是当我们书写多个SQL之后,就会觉得Mybatis仅仅是在第一次配置有些繁琐,后面书写SQL会很方便,而使用JDBC方式,每次写sql都会连带着5,60%的与业务无关的代码 ,而且每次都写的是一样的,比如获取Connection,获取Statement,关闭资源。
源码地址:
https://gitee.com/ooyhao/JavaRepo_Public/tree/master/Mybatis