Mybatis整合Spring操作DB:
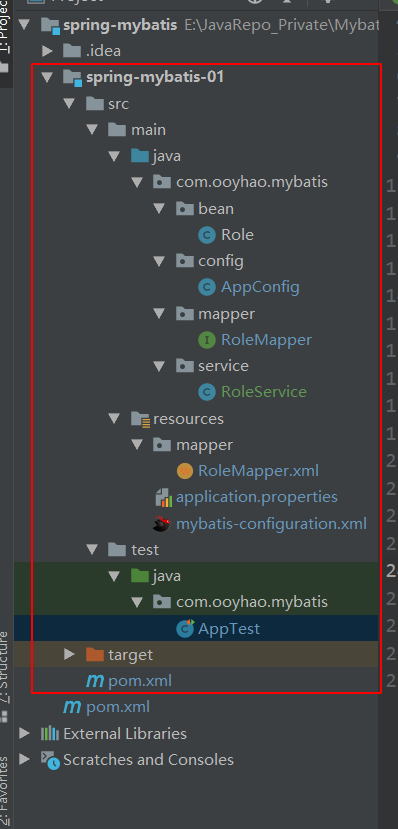
项目结构图
项目的POM依赖 1 2 3 4 5 6 7 8 9 10 11 12 13 14 15 16 17 18 19 20 21 22 23 24 25 26 27 28 29 30 31 32 33 34 35 36 37 38 39 40 41 42 43 44 45 46 47 48 49 50 51 52 53 54 55 56 57 58 59 60 61 62 63 64 65 66 67 68 69 70 71 72 73 74 75 76 77 78 79 80 81 82 83 84 85 86 87 88 89 90 91 92 93 94 95 96 97 98 99 100 101 102 103 104 105 106 107 108 109 110 111 112 113 114 115 116 117 118 119 120 121 122 123 124 125 126 127 128 129 130 131 132 133 <?xml version="1.0" encoding="UTF-8"?> <project xmlns ="http://maven.apache.org/POM/4.0.0" xmlns:xsi ="http://www.w3.org/2001/XMLSchema-instance" xsi:schemaLocation ="http://maven.apache.org/POM/4.0.0 http://maven.apache.org/xsd/maven-4.0.0.xsd" > <parent > <artifactId > spring-mybatis</artifactId > <groupId > com.ooyhao.mybatis</groupId > <version > 1.0-SNAPSHOT</version > </parent > <modelVersion > 4.0.0</modelVersion > <artifactId > spring-mybatis-01</artifactId > <name > spring-mybatis-01</name > <url > http://www.example.com</url > <properties > <project.build.sourceEncoding > UTF-8</project.build.sourceEncoding > <maven.compiler.source > 1.7</maven.compiler.source > <maven.compiler.target > 1.7</maven.compiler.target > </properties > <dependencies > <dependency > <groupId > junit</groupId > <artifactId > junit</artifactId > <version > 4.12</version > </dependency > <dependency > <groupId > org.springframework</groupId > <artifactId > spring-context</artifactId > <version > 5.1.9.RELEASE</version > </dependency > <dependency > <groupId > org.springframework</groupId > <artifactId > spring-context-support</artifactId > <version > 5.1.8.RELEASE</version > </dependency > <dependency > <groupId > org.mybatis</groupId > <artifactId > mybatis</artifactId > <version > 3.4.6</version > </dependency > <dependency > <groupId > org.mybatis</groupId > <artifactId > mybatis-spring</artifactId > <version > 1.3.2</version > </dependency > <dependency > <groupId > mysql</groupId > <artifactId > mysql-connector-java</artifactId > <version > 5.1.47</version > </dependency > <dependency > <groupId > com.alibaba</groupId > <artifactId > druid</artifactId > <version > 1.1.9</version > </dependency > <dependency > <groupId > org.springframework</groupId > <artifactId > spring-jdbc</artifactId > <version > 5.1.6.RELEASE</version > </dependency > <dependency > <groupId > org.springframework</groupId > <artifactId > spring-aop</artifactId > <version > 5.1.9.RELEASE</version > </dependency > <dependency > <groupId > org.springframework</groupId > <artifactId > spring-aspects</artifactId > <version > 5.1.6.RELEASE</version > </dependency > <dependency > <groupId > org.slf4j</groupId > <artifactId > slf4j-api</artifactId > <version > 1.8.0-beta0</version > </dependency > <dependency > <groupId > org.slf4j</groupId > <artifactId > slf4j-simple</artifactId > <version > 1.8.0-beta0</version > </dependency > <dependency > <groupId > org.projectlombok</groupId > <artifactId > lombok</artifactId > <version > 1.18.8</version > </dependency > <dependency > <groupId > com.fasterxml.jackson.core</groupId > <artifactId > jackson-databind</artifactId > <version > 2.10.0.pr3</version > </dependency > <dependency > <groupId > com.fasterxml.jackson.core</groupId > <artifactId > jackson-core</artifactId > <version > 2.10.0.pr3</version > </dependency > <dependency > <groupId > com.fasterxml.jackson.core</groupId > <artifactId > jackson-annotations</artifactId > <version > 2.10.0.pr3</version > </dependency > <dependency > <groupId > org.springframework</groupId > <artifactId > spring-tx</artifactId > <version > 5.1.8.RELEASE</version > </dependency > </dependencies > </project >
POM依赖也需要注意,所以我把完整的POM依赖贴出来,有的时候项目没问题,可能就是依赖搞错了导致项目运行不了、
Mybatis的全局配置 1 2 3 4 5 6 7 8 9 10 11 12 13 14 15 16 17 18 19 20 21 22 23 24 25 26 27 28 29 30 31 32 33 34 35 36 37 38 39 40 41 <?xml version="1.0" encoding="UTF-8" ?> <!DOCTYPE configuration PUBLIC "-//mybatis.org//DTD Config 3.0//EN" "http://mybatis.org/dtd/mybatis-3-config.dtd" > <configuration > <settings > <setting name ="mapUnderscoreToCamelCase" value ="true" /> </settings > </configuration >
可以看出,这里只是配置了一下开启驼峰命名,因为这一项在配置类中配置无效(测试结果),所以在配置文件中保留了这一项,其他的均可以通过配置类来配置。
properties文件 1 2 3 4 5 6 7 8 9 10 11 jdbc.driver = com.mysql.jdbc.Driver jdbc.url = jdbc:mysql://120.79.167.88:3306/mybatis?useUnicode=true&characterEncoding=UTF-8&allowMultiQueries=true&autoReconnect=true&useSSL=false jdbc.username = root jdbc.password = root mybatis.configuration = mybatis-configuration.xml mybatis.mapperLocations = mapper/*.xml mybatis.typeAliasesPackage = com.ooyhao.mybatis.bean
Spring配置类
1 2 3 4 5 6 7 8 9 10 11 12 13 14 15 16 17 18 19 20 21 22 23 24 25 26 27 28 29 30 31 32 33 34 35 36 37 38 39 40 41 42 43 44 45 46 47 48 49 50 51 52 53 54 55 56 57 58 59 60 61 62 63 64 65 66 67 68 69 70 71 72 73 74 75 76 77 78 79 80 81 82 83 84 85 86 87 88 89 90 91 92 93 94 95 96 97 98 99 100 101 102 103 package com.ooyhao.mybatis.config;import com.alibaba.druid.pool.DruidDataSource;import org.apache.ibatis.logging.stdout.StdOutImpl;import org.mybatis.spring.SqlSessionFactoryBean;import org.mybatis.spring.annotation.MapperScan;import org.springframework.beans.factory.annotation.Value;import org.springframework.context.annotation.Bean;import org.springframework.context.annotation.ComponentScan;import org.springframework.context.annotation.Configuration;import org.springframework.context.annotation.PropertySource;import org.springframework.core.io.ClassPathResource;import org.springframework.core.io.Resource;import org.springframework.core.io.support.PathMatchingResourcePatternResolver;import org.springframework.jdbc.datasource.DataSourceTransactionManager;import org.springframework.transaction.annotation.EnableTransactionManagement;import javax.sql.DataSource;@Configuration @PropertySource (value = "classpath:application.properties" ) @ComponentScan (basePackages = "com.ooyhao.mybatis" ) @MapperScan (basePackages = {"com.ooyhao.mybatis.mapper" }) @EnableTransactionManagement public class AppConfig @Value ("${jdbc.url}" ) private String url; @Value ("${jdbc.driver}" ) private String driverClassName; @Value ("${jdbc.username}" ) private String username; @Value ("${jdbc.password}" ) private String password; @Value ("${mybatis.configuration}" ) private String mybatisConfiguration; @Value ("${mybatis.mapperLocations}" ) private String mybatisMapperLocations; @Value ("${mybatis.typeAliasesPackage}" ) private String mybatisTypeAliasesPackage; @Bean public DataSource dataSource () DruidDataSource druidDataSource = new DruidDataSource(); druidDataSource.setUrl(url); druidDataSource.setDriverClassName(driverClassName); druidDataSource.setUsername(username); druidDataSource.setPassword(password); return druidDataSource; } @Bean public SqlSessionFactoryBean sqlSessionFactoryBean (DataSource dataSource) throws Exception { SqlSessionFactoryBean sqlSessionFactoryBean = new SqlSessionFactoryBean(); ClassPathResource resource = new ClassPathResource(mybatisConfiguration); sqlSessionFactoryBean.setConfigLocation(resource); PathMatchingResourcePatternResolver resolver = new PathMatchingResourcePatternResolver(); Resource[] resources = resolver.getResources(mybatisMapperLocations); sqlSessionFactoryBean.setMapperLocations(resources); sqlSessionFactoryBean.setTypeAliasesPackage(mybatisTypeAliasesPackage); sqlSessionFactoryBean.setDataSource(dataSource); sqlSessionFactoryBean.getObject().getConfiguration() .setMapUnderscoreToCamelCase(true ); sqlSessionFactoryBean.getObject().getConfiguration() .setLogImpl(StdOutImpl.class ) ; sqlSessionFactoryBean.getObject().getConfiguration().setCacheEnabled(true ); return sqlSessionFactoryBean; } @Bean public DataSourceTransactionManager transactionManager (DataSource dataSource) DataSourceTransactionManager transactionManager = new DataSourceTransactionManager(); transactionManager.setDataSource(dataSource); return transactionManager; } }
提示 :配置说明如注释;
RoleMapper 文件 1 2 3 4 public interface RoleMapper Role findById (Integer id) ; void deleteById (Integer id) }
RoleMapper XML 1 2 3 4 5 6 7 8 9 10 11 12 13 14 15 16 17 18 19 20 21 22 23 24 25 26 27 28 29 30 31 32 33 <?xml version="1.0" encoding="UTF-8" ?> <!DOCTYPE mapper PUBLIC "-//mybatis.org//DTD Mapper 3.0//EN" "http://mybatis.org/dtd/mybatis-3-mapper.dtd" > <mapper namespace ="com.ooyhao.mybatis.mapper.RoleMapper" > <cache eviction ="FIFO" flushInterval ="60000" readOnly ="true" size ="512" /> <resultMap id ="base_map" type ="role" > <id column ="id" jdbcType ="INTEGER" property ="id" /> <result column ="role_name" jdbcType ="VARCHAR" property ="roleName" /> <result column ="description" jdbcType ="VARCHAR" property ="description" /> <result column ="status" jdbcType ="INTEGER" property ="status" /> <result column ="create_time" jdbcType ="TIMESTAMP" property ="createTime" /> <result column ="create_user" jdbcType ="VARCHAR" property ="createUser" /> <result column ="modify_time" jdbcType ="TIMESTAMP" property ="modifyTime" /> <result column ="modify_user" jdbcType ="VARCHAR" property ="modifyUser" /> </resultMap > <select id ="findById" resultMap ="base_map" useCache ="true" > select * from tb_role where id = #{id} </select > <delete id ="deleteById" > delete from tb_role where id = #{id} </delete > </mapper >
RoleService 1 2 3 4 5 6 7 8 9 10 11 12 13 14 15 16 17 18 19 @Service public class RoleService @Autowired private RoleMapper roleMapper; public Role findById (Integer id) roleMapper.findById(id); return roleMapper.findById(id); } @Transactional public void deleteById (Integer id) roleMapper.deleteById(id); int i = 1 /0 ; } }
单元测试类 1 2 3 4 5 6 7 8 9 10 11 12 13 14 15 16 17 18 19 20 21 22 23 24 public class AppTest AnnotationConfigApplicationContext context = null ; @Before public void init () context = new AnnotationConfigApplicationContext(AppConfig.class ) ; } @Test public void testFindById () AnnotationConfigApplicationContext context = new AnnotationConfigApplicationContext(AppConfig.class ) ; RoleService bean = context.getBean(RoleService.class ) ; Role role = bean.findById(1 ); System.out.println(role); } @Test public void testDeleteById () RoleService service = context.getBean(RoleService.class ) ; service.deleteById(7 ); } }
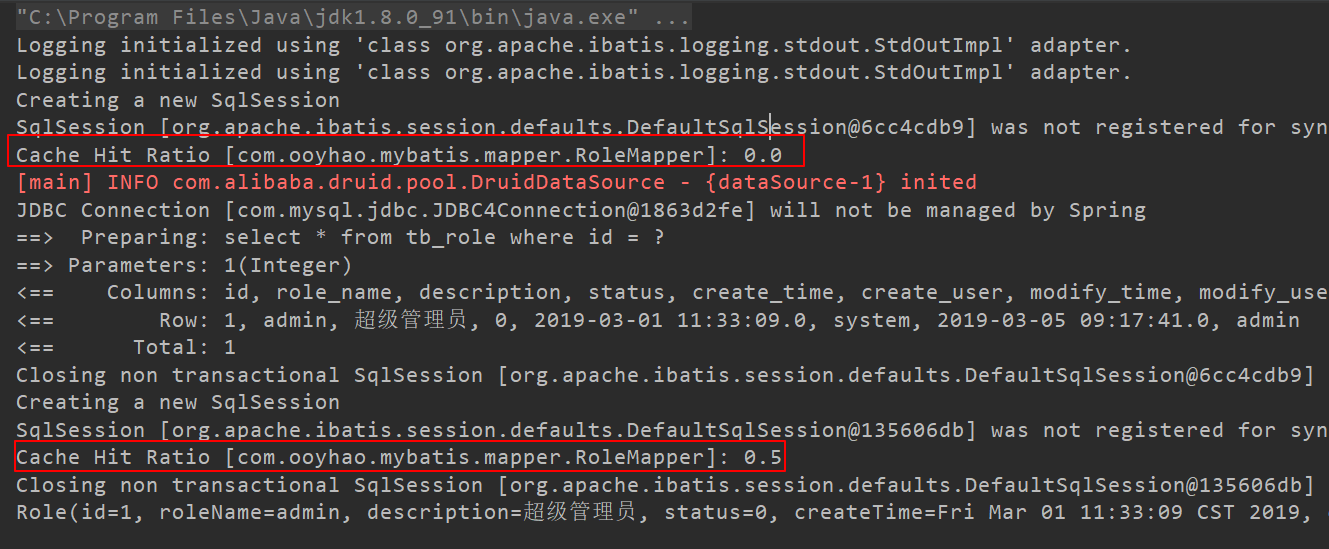
这里顺便测试一下Mapper的一级缓存和二级缓存:
当我们在查询Service上不使用事务注解的时候:
测试结果如下:
可以看出,这种情况下我们走的是二级缓存,即,在此情况下,一级缓存是没有生效的。
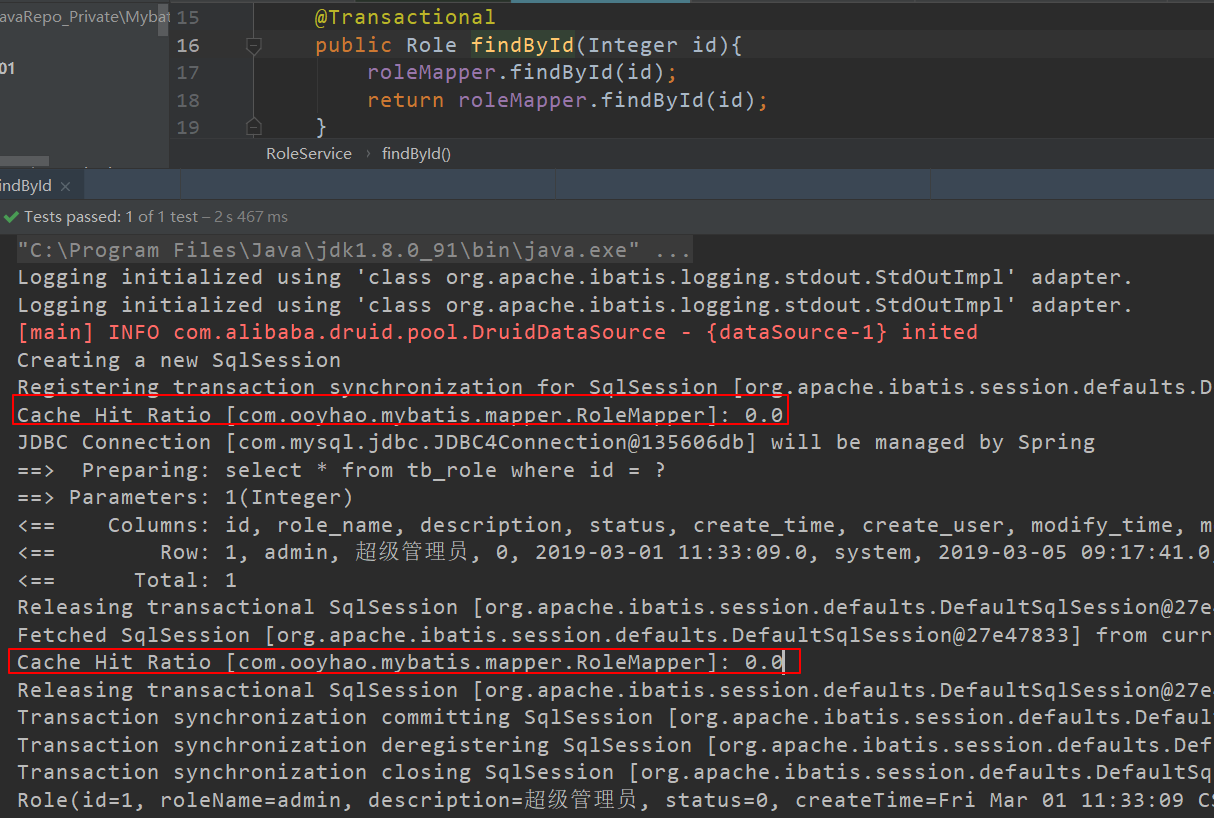
当我们在查询Service上加上事务时:
测试结果如下:
可以看出此时走的是一级缓存,因为二级缓存的击中率都是0,但是查询了两次,只发送一次SQL,所以此时可以看出是查询的一级缓存。
总结:
至此,Spring的基础和Mybatis的基础就完整的过了一遍了,将Mybatis的各种基础用法,动态SQL,结果映射都使用了一遍,同时前面的Spring中也将Spring的基础再次熟悉了一遍,比如自动装配,AOP,同时知道了如何不使用Web.xml和其他配置文件的情况下,搭建起一个web项目。
源码地址:
https://gitee.com/ooyhao/JavaRepo_Public/tree/master/Mybatis