面向切面的Spring
Aop 的概念
Aop :Aspect oriented Programming 面向切面编程,面向切面编程是面向对象编程的补充,而不是替代品。在运行时,动态地将代码切入到类的指定方法,指定位置上的编程思想就是面向切面编程。
Aop中的术语
通知(Advice)
通知定义了切面是什么以及何时使用。除了描述切面要完成的工作,通知还解决了何时执行这个工作的问题。它应该应用在某个方法被调用之前?之后?之前或是之后都调用?还是只在方法抛出异常时调用?
Spring切面可以应用的切面有五种:
- 前置通知(Before):在目标方法被调用之前调用通知方法。
- 后置通知(After):在目标方法完成之后调用通知,此时不会关心方法的输出是什么。
- 返回通知(After-Returning):在目标方法成功执行之后调用通知。
- 异常通知(After-Throwing):在目标方法抛出异常之后调用通知。
- 环绕通知(Around):通知包裹了被通知的方法,在被通知的方法调用之前和调用之后执行自定义的行为。
切面(Aspect)
Aspect声明类似与Java中类的声明,在Aspect中包含着一些Pointcut以及相应的 Advice。
连接点(Joint Point)
表示在程序中明确定义的点,典型的包括方法的调用,属性的修改,对类成员的访问以及异常处理程序块的执行等。它自身还可以嵌套其他的Joint Point。
切点(PointCut)
表示一组符合要求的Joint Point, 这些Joint Point 或是通过逻辑关系组合起来,或是通过通配,正则表达式等方法集中起来,它定义了相应的Advice将要发生的地方。
目标对象(Target)
织入Advice的目标对象。
织入(Weaving)
将Apsect和其他对象连接起来,并创建Adviced Object的过程。
案例解释术语
看到上面的术语其实非常的头痛,不知所云,那么下面用一个比较容易理解的例子来说明上述概念:(摘自网上 https://blog.csdn.net/q982151756/article/details/80513340)
下面我以一个简单的例子来比喻一下 AOP 中 Aspect, Joint point, Pointcut 与 Advice之间的关系.
让我们来假设一下, 从前有一个叫爪哇的小县城, 在一个月黑风高的晚上, 这个县城中发生了命案. 作案的凶手十分狡猾, 现场没有留下什么有价值的线索. 不过万幸的是, 刚从隔壁回来的老王恰好在这时候无意中发现了凶手行凶的过程, 但是由于天色已晚, 加上凶手蒙着面, 老王并没有看清凶手的面目, 只知道凶手是个男性, 身高约七尺五寸. 爪哇县的县令根据老王的描述, 对守门的士兵下命令说: 凡是发现有身高七尺五寸的男性, 都要抓过来审问. 士兵当然不敢违背县令的命令, 只好把进出城的所有符合条件的人都抓了起来.
来让我们看一下上面的一个小故事和 AOP 到底有什么对应关系.
首先我们知道, 在 Spring AOP 中 Joint point 指代的是所有方法的执行点, 而 point cut 是一个描述信息, 它修饰的是 Joint point, 通过 point cut, 我们就可以确定哪些 Joint point 可以被织入 Advice. 对应到我们在上面举的例子, 我们可以做一个简单的类比, Joint point 就相当于 爪哇的小县城里的百姓,pointcut 就相当于 老王所做的指控, 即凶手是个男性, 身高约七尺五寸, 而 Advice 则是施加在符合老王所描述的嫌疑人的动作: 抓过来审问.
为什么可以这样类比呢?
Join point : 爪哇的小县城里的百姓: 因为根据定义, Joint point 是所有可能被织入 Advice 的候选的点, 在 Spring AOP中, 则可以认为所有方法执行点都是 Joint point. 而在我们上面的例子中, 命案发生在小县城中, 按理说在此县城中的所有人都有可能是嫌疑人.
Pointcut :男性, 身高约七尺五寸: 我们知道, 所有的方法(joint point) 都可以织入 Advice, 但是我们并不希望在所有方法上都织入 Advice, 而 Pointcut 的作用就是提供一组规则来匹配joinpoint, 给满足规则的 joinpoint 添加 Advice. 同理, 对于县令来说, 他再昏庸, 也知道不能把县城中的所有百姓都抓起来审问, 而是根据凶手是个男性, 身高约七尺五寸, 把符合条件的人抓起来. 在这里 凶手是个男性, 身高约七尺五寸 就是一个修饰谓语, 它限定了凶手的范围, 满足此修饰规则的百姓都是嫌疑人, 都需要抓起来审问.
Advice :抓过来审问, Advice 是一个动作, 即一段 Java 代码, 这段 Java 代码是作用于 point cut 所限定的那些 Joint point 上的. 同理, 对比到我们的例子中, 抓过来审问 这个动作就是对作用于那些满足 男性, 身高约七尺五寸 的爪哇的小县城里的百姓.
Aspect:Aspect 是 point cut 与 Advice 的组合, 因此在这里我们就可以类比: “根据老王的线索, 凡是发现有身高七尺五寸的男性, 都要抓过来审问” 这一整个动作可以被认为是一个 Aspect.
AspectJ指示器
可参考官方文档:
https://docs.spring.io/spring/docs/5.1.9.RELEASE/spring-framework-reference/core.html#aop-aspectj-support
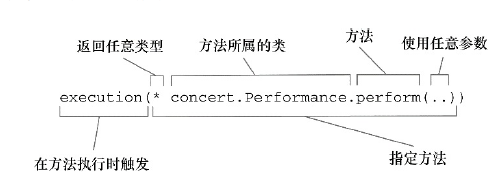
切入点表达式解释:

AspectJ注解
| 注解 |
通知 |
| @After |
通知方法会在目标方法返回或抛出异常后调用 |
| @AfterReturning |
通知方法会在目标方法返回后调用 |
| @AfterThrowing |
通知方法会在目标方法抛出异常后调用 |
| @Around |
通知方法会将目标方法包裹起来 |
| @Before |
通知方法会再目标方法调用之前执行 |
Aop配置元素
spring的Aop配置元素能够以非侵入性的方式声明切面
Java注解方式实现Aop
表演接口:
1
2
3
| public interface Performance {
String perform();
}
|
音乐表演:
1
2
3
4
5
6
7
8
9
|
@Component
public class MusicPerformance implements Performance {
public String perform() {
System.out.println(">>>>>演员正在表演进行音乐演唱<<<<<");
return "MusicPerformance";
}
}
|
切面定义:
1
2
3
4
5
6
7
8
9
10
11
12
13
14
15
16
17
18
19
20
21
22
23
24
25
26
27
28
29
30
31
32
33
34
35
36
37
38
39
40
41
42
43
44
45
46
47
48
49
50
51
52
53
| package com.ooyhao.spring.aop;
import org.aspectj.lang.JoinPoint;
import org.aspectj.lang.ProceedingJoinPoint;
import org.aspectj.lang.annotation.*;
import org.springframework.stereotype.Component;
@Aspect
@Component
public class PerformanceAspect {
@Pointcut("execution(* *.perform(..))")
public void pointCut(){}
@Before("pointCut()")
public void offPhone(){
System.out.println("将手机关机或调为静音");
}
@After("pointCut()")
public void clean(){
System.out.println("清理座位旁边的垃圾");
}
@Around(value = "pointCut()")
public Object writeInfo(ProceedingJoinPoint joinPoint) throws Throwable {
System.out.println("记录表演人员信息和歌曲名称");
Object result = joinPoint.proceed();
System.out.println("记录表演时间!");
return result;
}
@AfterThrowing(value = "pointCut()", throwing = "exception")
public void refund(JoinPoint joinPoint, Exception exception){
System.out.println(exception.getMessage());
System.out.println("观看不满意,要求退款");
}
@AfterReturning(value = "pointCut()" , returning = "result")
public void applause(JoinPoint joinPoint,Object result){
System.out.println("result:"+result);
System.out.println("起身并鼓掌");
}
}
|
测试类以测试结果:
1
2
3
4
5
6
7
8
9
10
11
12
13
14
15
16
17
18
| @Test
public void testJavaConfigAop(){
AnnotationConfigApplicationContext context
= new AnnotationConfigApplicationContext(AopConfig.class);
Performance bean = context.getBean(Performance.class);
System.out.println(bean);
bean.perform();
}
|
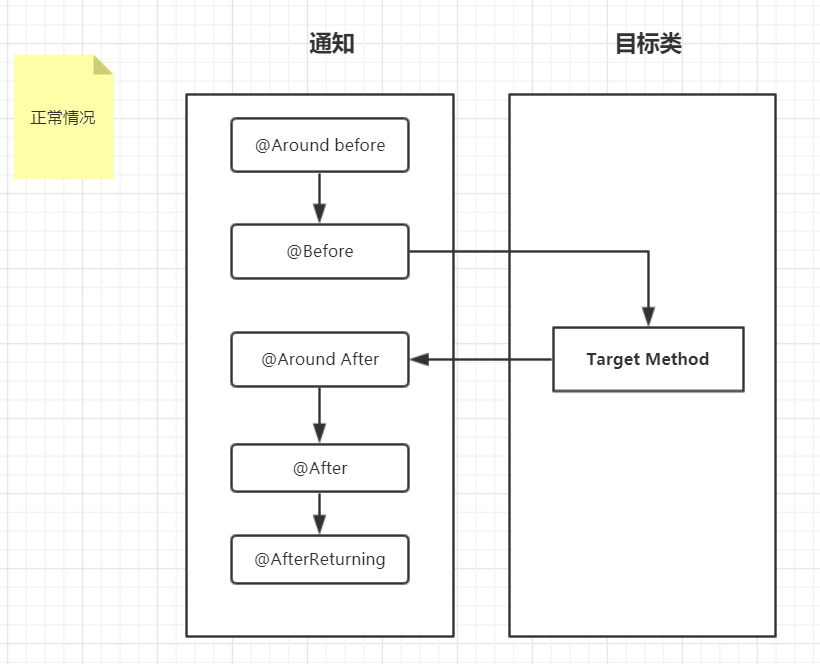
由上述的测试结果可以看出,通知的执行流程是:

当出现异常时:
目标方法执行时出现异常:
1
2
3
4
5
6
7
8
| @Component
public class MusicPerformance implements Performance {
public void perform() {
System.out.println(">>>>>演员正在表演进行音乐演唱<<<<<");
int i = 1/0;
}
}
|
异常时执行结果:
1
2
3
4
5
6
7
| 记录表演人员信息和歌曲名称
将手机关机或调为静音
>>>>>演员正在表演进行音乐演唱<<<<<
清理座位旁边的垃圾
观看不满意,要求退款
java.lang.ArithmeticException: / by zero
|

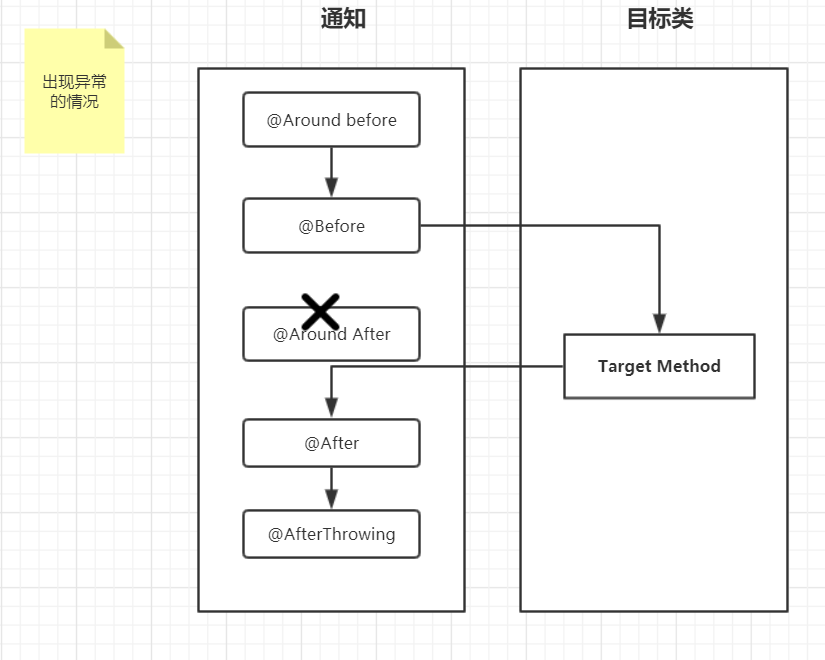
由上述两个流程图可以看出:
正常情况时:
环绕通知目标方法前–>前置通知–>目标方法–>环绕通知目标方法后–>后置通知–>返回通知。
异常情况时:
环绕通知目标方法前–>前置通知–>目标方法–>后置通知–>异常通知。
总结:
正常情况下,不会执行异常通知(AfterTrowing),异常情况下,不会执行环绕通知目标方法后的代码(Around after),也不会执行返回通知(AfterReturning)。
Xml配置方式实现Aop
切面:使用Xml方式,切面就是一个普通的Java类
1
2
3
4
5
6
7
8
9
10
11
12
13
14
15
16
17
18
19
20
21
22
23
24
25
26
27
28
29
30
31
32
33
34
35
36
37
38
39
40
41
42
43
44
45
46
47
48
| package com.ooyhao.spring.aop;
import org.aspectj.lang.JoinPoint;
import org.aspectj.lang.ProceedingJoinPoint;
import org.aspectj.lang.annotation.*;
import org.springframework.stereotype.Component;
public class PerformanceAspect {
public void offPhone(JoinPoint joinPoint){
System.out.println("将手机关机或调为静音");
}
public void clean(JoinPoint joinPoint){
System.out.println("清理座位旁边的垃圾");
}
public Object writeInfo(ProceedingJoinPoint joinPoint) throws Throwable {
System.out.println("记录表演人员信息和歌曲名称");
Object result = joinPoint.proceed();
System.out.println("记录表演时间!");
return result;
}
public void refund(JoinPoint joinPoint, Exception exception){
System.out.println(exception.getMessage());
System.out.println("观看不满意,要求退款");
}
public void applause(JoinPoint joinPoint, Object result) {
System.out.println("AfterReturning :result "+result);
System.out.println("起身并鼓掌");
}
}
|
Xml配置文件:
1
2
3
4
5
6
7
8
9
10
11
12
13
14
15
16
17
18
19
20
21
22
23
24
25
26
27
28
29
30
| <?xml version="1.0" encoding="UTF-8"?>
<beans xmlns="http://www.springframework.org/schema/beans"
xmlns:aop="http://www.springframework.org/schema/aop"
xmlns:xsi="http://www.w3.org/2001/XMLSchema-instance"
xsi:schemaLocation="http://www.springframework.org/schema/beans
http://www.springframework.org/schema/beans/spring-beans.xsd
http://www.springframework.org/schema/aop
https://www.springframework.org/schema/aop/spring-aop.xsd">
<bean class="com.ooyhao.spring.bean.MusicPerformance"/>
<aop:aspectj-autoproxy/>
<bean id="performanceAspect" class="com.ooyhao.spring.aop.PerformanceAspect"/>
<aop:config>
<aop:aspect ref="performanceAspect">
<aop:pointcut id="pointCut" expression="execution(* *.perform(..))"/>
<aop:before method="offPhone" pointcut-ref="pointCut"/>
<aop:after method="clean" pointcut-ref="pointCut"/>
<aop:around method="writeInfo" pointcut-ref="pointCut"/>
<aop:after-returning method="applause" pointcut-ref="pointCut" returning="result" />
<aop:after-throwing method="refund" pointcut-ref="pointCut" throwing="exception"/>
</aop:aspect>
</aop:config>
</beans>
|
测试及结果:
1
2
3
4
5
6
7
8
9
10
11
12
13
14
15
| @Test
public void testXmlAop(){
ClassPathXmlApplicationContext context
= new ClassPathXmlApplicationContext("springAop.xml");
Performance performance = context.getBean(Performance.class);
performance.perform();
}
|
注意:可以看出,使用Java配置的方式和Xml配置的方式,通知执行顺序有差异。
JoinPoint 对象
JoinPoint
JoinPoint对象封装了SpringAop中切面方法的信息,在切面方法中添加JoinPoint参数,就可以获取到封装了该方法的JoinPoint对象。
常用API:
| 方法名 |
功能 |
| Signature getSignature() |
获取封装了署名信息的对象,在该对象中可以获取目标方法的方法名,所属类的Class等信息。 |
| Object[] getArgs() |
获取传入目标方法的参数对象 |
| Object[] getTarget() |
获取被代理的对象 |
| Object[] getThis() |
获取代理对象 |
|
|
ProceedingJoinPoint
ProceedingJoinPoint 对象是JoinPoint的子接口,该对象只用在@Around的切面方法中,添加了两个方法:
Object proceed() trows Trowable //执行目标方法
Object proceed(Object[] var1) throws Throwable //传入的新的参数去执行目标方法
案例说明
User类:
1
2
3
4
| public class User {
private String name;
private Integer age;
}
|
UserService类:
1
2
3
4
5
6
| @Component
public class UserService {
public void Login(User user,String authCode){
System.out.println("user: "+user+" authCode: "+authCode);
}
}
|
切面类:
1
2
3
4
5
6
7
8
9
10
11
12
13
14
15
16
17
18
19
20
21
22
23
24
25
26
27
28
29
30
31
32
33
34
35
36
37
38
39
40
41
42
43
44
45
46
47
48
49
50
51
52
53
54
55
| @Component
@Aspect
public class UserAspect {
@Pointcut("execution(* *Login(..))")
public void pointCut(){}
@Around("pointCut()")
public Object checkPermission(ProceedingJoinPoint joinPoint) throws Throwable {
Object[] args = joinPoint.getArgs();
System.out.println(Arrays.toString(args));
Signature signature = joinPoint.getSignature();
String name = signature.getName();
System.out.println(name);
Class aClass = signature.getDeclaringType();
System.out.println(aClass);
String typeName = signature.getDeclaringTypeName();
System.out.println(typeName);
int modifiers = signature.getModifiers();
System.out.println(modifiers);
Object target = joinPoint.getTarget();
System.out.println(target);
Object aThis = joinPoint.getThis();
System.out.println(aThis);
Object obj = joinPoint.proceed(new Object[]{new User("李四",24),"123abc"});
return obj;
}
}
|
配置类:
1
2
3
| @ComponentScan(basePackages = "com.ooyhao.spring")
@EnableAspectJAutoProxy
public class UserAopConfig {}
|
对现有类增加方法
至此,SpringAop的JavaConfig配置类和Xml配置文件形式都已经学完,但是Aop中 @Before、@After、@Around、@AfterReturning、@AfterTrowing这几种通知都是只对目标类的目标方法进行增强,但是无法向目标方法注入新的方法。这么强大的Spring,肯定有相应的解决办法啦!那就是使用@DeclareParents 注解实现。
Java配置类方式
学生接口:
1
2
3
| public interface Student {
void readBook();
}
|
学生实现类:
1
2
3
4
5
6
| @Component
public class CollegeStudent implements Student {
public void readBook() {
System.out.println("我在阅读大学必修书籍!");
}
}
|
教师接口:
1
2
3
4
|
public interface Teacher {
void speak();
}
|
教师实现类:
1
2
3
4
5
| public class EnglishTeacher implements Teacher {
public void speak() {
System.out.println("我会说英语!");
}
}
|
切面:
1
2
3
4
5
6
| @Aspect
@Component
public class StudentAspect {
@DeclareParents(value = "com.ooyhao.spring.bean.Student+",defaultImpl = EnglishTeacher.class)
private Teacher teacher;
}
|
配置类:
1
2
3
| @ComponentScan(basePackages = "com.ooyhao.spring")
@EnableAspectJAutoProxy
public class AopConfig {}
|
单元测试:
1
2
3
4
5
6
7
8
9
| @Test
public void testAop(){
AnnotationConfigApplicationContext context
= new AnnotationConfigApplicationContext(AopConfig.class);
Student bean = context.getBean(Student.class);
bean.readBook();
Teacher t = (Teacher)bean;
t.speak();
}
|
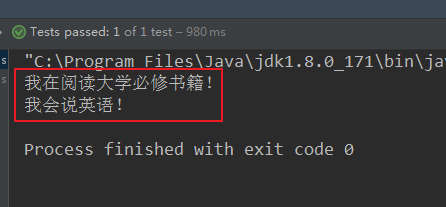
结果:

解释:首先教师和学生都是一个普通的java类,切面类中依旧使用@Aspect注解来定义其为一个切面类,使用@Component标注为一个Spring组件。而在配置类中使用@ComponentScan注解用来对组件进行扫描。使用@EnableAspectJAutoProxy 开启AspectJ自动代理。
需要研究的是切面中的内容:
1
2
3
| @DeclareParents(value = "com.ooyhao.spring.bean.Student+",
defaultImpl = EnglishTeacher.class)
private Teacher teacher;
|
属性teacher表示将哪种类型声明为增加类。而使用@DeclareParents注解来声明需要增加和实际定义了增加方法的实际类。其中value表示向所有Student类及其子类增加方法,增加的方法的实际来源是在defaultImpl中定义的,即:增加的方法在EnglishTeacher中定义。并且在实际类型转化的时候,不能将测试代码中的bean强转为EnglishTeacher,只能强转为Teacher类型。
解释:@DeclareParents 注解由三部分组成:
- value 属性指定了哪种类型的bean要引入该接口。(标记符后面的加号,表示的是所有的子类,而不是其自身。)
- defaultImpl 属性指定了为引入功能提供实现的类。
- @DeclareParents 注解所标注的静态属性指明了要引入的接口。
Xml配置文件方式
1
2
3
4
5
6
7
8
9
10
11
12
13
14
15
16
17
18
19
20
21
22
23
24
25
26
27
28
29
30
31
32
33
34
| <?xml version="1.0" encoding="UTF-8"?>
<beans xmlns="http://www.springframework.org/schema/beans"
xmlns:xsi="http://www.w3.org/2001/XMLSchema-instance"
xmlns:aop="http://www.springframework.org/schema/aop"
xmlns:context="http://www.springframework.org/schema/context"
xmlns:tx="http://www.springframework.org/schema/tx"
xmlns:mvc="http://www.springframework.org/schema/mvc"
xsi:schemaLocation="http://www.springframework.org/schema/beans
http://www.springframework.org/schema/beans/spring-beans.xsd
http://www.springframework.org/schema/aop
http://www.springframework.org/schema/aop/spring-aop.xsd
http://www.springframework.org/schema/context
http://www.springframework.org/schema/context/spring-context.xsd
http://www.springframework.org/schema/tx
http://www.springframework.org/schema/tx/spring-tx.xsd
http://www.springframework.org/schema/mvc
http://www.springframework.org/schema/mvc/spring-mvc.xsd">
<context:component-scan base-package="com.ooyhao.spring"/>
<bean id="englishTeacher"
class="com.ooyhao.spring.bean.EnglishTeacher"/>
<aop:config>
<aop:aspect>
<aop:declare-parents
types-matching="com.ooyhao.spring.bean.Student+"
implement-interface="com.ooyhao.spring.bean.Teacher"
delegate-ref="englishTeacher"/>
</aop:aspect>
</aop:config>
<aop:aspectj-autoproxy/>
</beans>
|
单元测试:在获取Bean的时候,下列代码中只能获取Student类型,不能获取Student实现类CollegeStudent类型的Bean。
1
2
3
4
5
6
7
8
9
| @Test
public void testXmlAop(){
ClassPathXmlApplicationContext context
= new ClassPathXmlApplicationContext("AopConfig.xml");
Student bean = context.getBean(Student.class);
bean.readBook();
Teacher teacher = (Teacher)bean;
teacher.speak();
}
|
本节主要是学习SpringAop的基于Java配置和Xml配置两种方式的使用方法,以及SpringAop中五种通知做不到的,就是在目标类中添加方法,SpringAop中的五种通知只能增强方法,而不能添加方法到目标类中,SpringAop提供了另外一种解决方案:@DeclareParents.


