SpringMVC高级技术
通过web.xml加载JavaConfig配置 我们前面使用了纯web.xml形式加载applicationContext.xml和springmvc.xml配置文件来搭建一个web项目,也使用AbstractAnnotationConfigDispatcherServletInitializer纯java配置的形式加载ServletConfig.java和RootConfig.java配置类来搭建web项目,这次我们使用web.xml形式结合ServletConfig.java和RootConfig.java搭建项目。
web.xml文件如下:
1
2
3
4
5
6
7
8
9
10
11
12
13
14
15
16
17
18
19
20
21
22
23
24
25
26
27
28
29
30
31
32
33
34
35
36
37
38
39
40
41
42
<!DOCTYPE web-app PUBLIC "-//Sun Microsystems, Inc.//DTD Web Application 2.3//EN" "http://java.sun.com/dtd/web-app_2_3.dtd" > <web-app > <display-name > Archetype Created Web Application</display-name > <context-param > <param-name > contextClass</param-name > <param-value > org.springframework.web.context.support.AnnotationConfigWebApplicationContext </param-value > </context-param > <context-param > <param-name > contextConfigLocation</param-name > <param-value > com.ooyhao.spring.config.RootConfig</param-value > </context-param > <listener > <listener-class > org.springframework.web.context.ContextLoaderListener</listener-class > </listener > <servlet > <servlet-name > dispatcherServlet</servlet-name > <servlet-class > org.springframework.web.servlet.DispatcherServlet</servlet-class > <init-param > <param-name > contextClass</param-name > <param-value > org.springframework.web.context.support.AnnotationConfigWebApplicationContext </param-value > </init-param > <init-param > <param-name > contextConfigLocation</param-name > <param-value > com.ooyhao.spring.config.ServletConfig</param-value > </init-param > <load-on-startup > 1</load-on-startup > </servlet > <servlet-mapping > <servlet-name > dispatcherServlet</servlet-name > <url-pattern > /</url-pattern > </servlet-mapping > </web-app >
web加载配置类实现上传文件 POM文件 1 2 3 4 5 6 7 8 9 10 11 12 13 14 15 16 17 18 19 20 21 22 23 24 25 26 27 28 29 30 31 32 33 34 35 36 37 38 39 40 41 42 43 44 45 46 47 48 49 50 51 52 53 54 55 56 57 58 59 60 61 62 63 64 65 66 67 68 69 70 71 72 73 74 75 76 77 78 79 80 81 82 83 84 85 86 87 88 89 90 91 92 93 94 95 96 97 98 99 100 101 102 103 104 105 106 107 108 109 110 111 112 113 114 115 116 117 118 119 <?xml version="1.0" encoding="UTF-8"?> <project xmlns ="http://maven.apache.org/POM/4.0.0" xmlns:xsi ="http://www.w3.org/2001/XMLSchema-instance" xsi:schemaLocation ="http://maven.apache.org/POM/4.0.0 http://maven.apache.org/xsd/maven-4.0.0.xsd" > <modelVersion > 4.0.0</modelVersion > <groupId > com.ooyhao.spring</groupId > <artifactId > spring-in-action-07-01</artifactId > <version > 1.0-SNAPSHOT</version > <packaging > war</packaging > <name > spring-in-action-07-01 Maven Webapp</name > <url > http://www.example.com</url > <properties > <project.build.sourceEncoding > UTF-8</project.build.sourceEncoding > <maven.compiler.source > 1.7</maven.compiler.source > <maven.compiler.target > 1.7</maven.compiler.target > </properties > <dependencies > <dependency > <groupId > junit</groupId > <artifactId > junit</artifactId > <version > 4.11</version > <scope > test</scope > </dependency > <dependency > <groupId > javax.servlet</groupId > <artifactId > javax.servlet-api</artifactId > <version > 4.0.1</version > </dependency > <dependency > <groupId > org.springframework</groupId > <artifactId > spring-webmvc</artifactId > <version > 5.1.9.RELEASE</version > </dependency > <dependency > <groupId > com.fasterxml.jackson.core</groupId > <artifactId > jackson-databind</artifactId > <version > 2.9.8</version > </dependency > <dependency > <groupId > com.fasterxml.jackson.core</groupId > <artifactId > jackson-annotations</artifactId > <version > 2.9.8</version > </dependency > <dependency > <groupId > junit</groupId > <artifactId > junit</artifactId > <version > 4.11</version > <scope > test</scope > </dependency > <dependency > <groupId > org.hibernate.validator</groupId > <artifactId > hibernate-validator</artifactId > <version > 6.1.0.Alpha3</version > </dependency > <dependency > <groupId > org.thymeleaf</groupId > <artifactId > thymeleaf</artifactId > <version > 3.0.11.RELEASE</version > </dependency > <dependency > <groupId > org.thymeleaf</groupId > <artifactId > thymeleaf-spring5</artifactId > <version > 3.0.9.RELEASE</version > </dependency > </dependencies > <build > <finalName > spring-in-action-07-01</finalName > <pluginManagement > <plugins > <plugin > <artifactId > maven-clean-plugin</artifactId > <version > 3.1.0</version > </plugin > <plugin > <artifactId > maven-resources-plugin</artifactId > <version > 3.0.2</version > </plugin > <plugin > <artifactId > maven-compiler-plugin</artifactId > <version > 3.8.0</version > </plugin > <plugin > <artifactId > maven-surefire-plugin</artifactId > <version > 2.22.1</version > </plugin > <plugin > <artifactId > maven-war-plugin</artifactId > <version > 3.2.2</version > </plugin > <plugin > <artifactId > maven-install-plugin</artifactId > <version > 2.5.2</version > </plugin > <plugin > <artifactId > maven-deploy-plugin</artifactId > <version > 2.8.2</version > </plugin > </plugins > </pluginManagement > </build > </project >
web.xml 1 2 3 4 5 6 7 8 9 10 11 12 13 14 15 16 17 18 19 20 21 22 23 24 25 26 27 28 29 30 31 32 33 34 35 36 37 38 39 40 41 42 43 44 45 46 47 48 49 50 51 52 53 54 <?xml version="1.0" encoding="UTF-8"?> <web-app xmlns:xsi ="http://www.w3.org/2001/XMLSchema-instance" xmlns ="http://java.sun.com/xml/ns/javaee" xsi:schemaLocation ="http://java.sun.com/xml/ns/javaee http://java.sun.com/xml/ns/javaee/web-app_3_0.xsd" id ="WebApp_ID" version ="3.0" > <display-name > Archetype Created Web Application</display-name > <context-param > <param-name > contextClass</param-name > <param-value > org.springframework.web.context.support.AnnotationConfigWebApplicationContext </param-value > </context-param > <context-param > <param-name > contextConfigLocation</param-name > <param-value > com.ooyhao.spring.config.RootConfig</param-value > </context-param > <listener > <listener-class > org.springframework.web.context.ContextLoaderListener </listener-class > </listener > <servlet > <servlet-name > dispatcherServlet</servlet-name > <servlet-class > org.springframework.web.servlet.DispatcherServlet </servlet-class > <init-param > <param-name > contextClass</param-name > <param-value > org.springframework.web.context.support.AnnotationConfigWebApplicationContext </param-value > </init-param > <init-param > <param-name > contextConfigLocation</param-name > <param-value > com.ooyhao.spring.config.ServletConfig</param-value > </init-param > <load-on-startup > 1</load-on-startup > <multipart-config > <location > D:\data</location > <max-file-size > 52428800</max-file-size > <max-request-size > 52428800</max-request-size > <file-size-threshold > 0</file-size-threshold > </multipart-config > </servlet > <servlet-mapping > <servlet-name > dispatcherServlet</servlet-name > <url-pattern > /</url-pattern > </servlet-mapping > </web-app >
我们这里使用了web.xml文件来加载配置类的形式搭建web项目。为了实现文件上传,我们可以看出这个web.xml中与前一节不同的是,多个下面几行代码:
1 2 3 4 5 6 <multipart-config > <location > D:\data</location > <max-file-size > 52428800</max-file-size > <max-request-size > 52428800</max-request-size > <file-size-threshold > 0</file-size-threshold > </multipart-config >
这个就是用于配置文件上传的一些信息,
location:表示文件上传存储的位置。
max-file-size:上传文件的最大容量(以字节为单位)。默认是没有限制的。
max-request-size:整合multipart请求的最大容量(以字节为单位),不会关心有多少个part以及每一个part的大小,默认是没有限制的。
file-size-threshold:在上传过程中,如果文件大小达到了一个指定最大容量(以字节为单位),将会写入到临时文件路径中。默认为0,也就是所有上传的文件都会写入到磁盘上。
ServletConfig 1 2 3 4 5 6 7 8 9 10 11 12 13 14 15 16 17 18 19 20 21 22 23 24 25 26 27 28 29 30 31 32 33 34 35 36 37 38 39 40 41 42 43 44 45 46 47 48 @Configuration @EnableWebMvc @ComponentScan (basePackages = "com.ooyhao.spring.**.controller" )public class ServletConfig @Bean public MultipartResolver multipartResolver () StandardServletMultipartResolver resolver = new StandardServletMultipartResolver(); return resolver; } @Bean public SpringResourceTemplateResolver templateResolver () SpringResourceTemplateResolver resolver = new SpringResourceTemplateResolver(); resolver.setPrefix("/WEB-INF/templates/" ); resolver.setSuffix(".html" ); resolver.setCharacterEncoding("utf-8" ); resolver.setCacheable(true ); resolver.setTemplateMode(TemplateMode.HTML); return resolver; } @Bean public SpringTemplateEngine templateEngine () SpringTemplateEngine engine = new SpringTemplateEngine(); engine.setTemplateResolver(templateResolver()); engine.setEnableSpringELCompiler(true ); return engine; } @Bean public ThymeleafViewResolver viewResolver () ThymeleafViewResolver resolver = new ThymeleafViewResolver(); resolver.setCharacterEncoding("utf-8" ); resolver.setTemplateEngine(templateEngine()); return resolver; } }
配置文件中与以往不同的是,增加了一个MultipartResolver。
register.html 1 2 3 4 5 6 7 8 9 10 11 12 13 14 15 16 17 18 19 20 21 22 23 24 25 26 27 28 29 30 31 32 33 34 35 36 37 38 39 40 41 42 43 44 45 46 47 48 49 50 51 52 53 54 55 56 <!DOCTYPE html > <html xmlns ="http://www.w3.org/1999/xhtml" xmlns:th ="http://www.thymeleaf.org" > <head > <title > Blog</title > <meta charset ="utf-8" > </head > <style > span .error { color :red ; } div .errors { background-color : #ffcccc ; border: 2px solid red; } label .error { color :red ; } input .error { background-color : #ffcccc ; } </style > </head > <body > <h1 > 欢迎加入Spring的大家庭</h1 > <form method ="post" th:object ="${user}" enctype ="multipart/form-data" > <div class ="errors" th:if ="${#fields.hasErrors('*')}" > <ul > <li th:each ="err : ${#fields.errors('*')}" th:text ="${err}" > Input is Incorrect </li > </ul > </div > <label th:class ="${#fields.hasErrors('username')} ? 'error' " > 账号: </label > <input type ="text" th:field ="*{username}" th:class ="${#fields.hasErrors('username')} ? 'error'" /> <br > <label th:class ="${#fields.hasErrors('password')} ? 'error' " > 密码:</label > <input type ="password" th:field ="*{password}" th:class ="${#fields.hasErrors('password')} ? 'error'" /> <br > <label th:class ="${#fields.hasErrors('age')} ? 'error' " > 年龄:</label > <input th:field ="*{age}" th:class ="${#fields.hasErrors('age')} ? 'error'" /> <br > <label > 图片:</label > <input type ="file" name ="file" accept ="image/jpeg,image/png,image/gif" > <br > <input type ="submit" value ="提交" > <br > </form > </body > </html >
IndexController.java 1 2 3 4 5 6 7 8 9 10 11 12 13 14 15 16 17 18 19 20 21 22 23 24 25 26 27 28 29 30 31 32 33 34 35 36 37 38 39 40 41 42 43 44 45 46 47 48 49 50 51 52 53 54 55 56 57 58 59 60 61 62 63 package com.ooyhao.spring.controller;import com.ooyhao.spring.bean.User;import com.ooyhao.spring.service.UserService;import org.springframework.beans.factory.annotation.Autowired;import org.springframework.stereotype.Controller;import org.springframework.ui.Model;import org.springframework.validation.BindingResult;import org.springframework.web.bind.annotation.GetMapping;import org.springframework.web.bind.annotation.PostMapping;import org.springframework.web.multipart.MultipartFile;import javax.validation.Valid;import java.io.File;import java.io.IOException;@Controller public class IndexController @Autowired private UserService userService; @GetMapping ("/" ) public String home () return "home" ; } @GetMapping ("/register" ) public String toRegister (Model model) model.addAttribute("user" ,new User()); return "register" ; } @PostMapping ("/register" ) public String register (@Valid User user, MultipartFile file, BindingResult bindingResult, Model model) throws IOException { if (bindingResult.hasErrors()){ System.out.println("错误数目:" + bindingResult.getErrorCount()); model.addAttribute(user); return "register" ; } if (!file.isEmpty()){ file.transferTo( new File(System.currentTimeMillis() +file.getOriginalFilename().substring( file.getOriginalFilename().indexOf("." )))); } userService.saveUser(user); return "redirect:/registerSuccess" ; } @GetMapping ("/registerSuccess" ) public String registerSuccess () return "registerSuccess" ; } @GetMapping ("/registerFail" ) public String registerFail () return "registerFail" ; } }
Controller接收前端上传文件普通方式是使用byte[],或是Part接收,如下:
1
2
3
4
5
6
@PostMapping ("/register" )public String register (@RequestPart("file" ) byte [] file)@PostMapping ("/register" )public String register (@RequestPart("file" ) Part file)
但是,我们一般是使用SpringMVC的MultipartFile来接收文件。下面看一下这个接口的方法:
1
2
3
4
5
6
7
8
9
10
11
12
13
14
15
16
17
18
19
20
21
22
23
24
25
26
27
28
29
public interface MultipartFile extends InputStreamSource String getName () ; @Nullable String getOriginalFilename () ; @Nullable String getContentType () ; boolean isEmpty () long getSize () byte [] getBytes() throws IOException; @Override InputStream getInputStream () throws IOException ; default Resource getResource () return new MultipartFileResource(this ); } void transferTo (File dest) throws IOException, IllegalStateException default void transferTo (Path dest) throws IOException, IllegalStateException FileCopyUtils.copy(getInputStream(), Files.newOutputStream(dest)); } }
效果图:
纯配置文件形式实现文件上传 POM依赖 1 2 3 4 5 6 7 8 9 10 11 12 13 14 15 16 17 18 19 20 21 22 23 24 25 26 27 28 29 30 31 32 33 34 35 36 37 38 39 40 41 42 43 44 45 46 47 48 49 50 51 52 53 54 55 56 57 58 59 60 61 62 63 64 65 66 67 68 69 70 71 72 73 74 75 76 77 78 79 80 81 82 83 84 85 86 87 88 89 90 91 92 93 94 95 96 97 98 99 100 101 102 103 104 105 106 107 108 109 110 111 112 113 114 115 116 117 118 119 120 121 122 <?xml version="1.0" encoding="UTF-8"?> <project xmlns ="http://maven.apache.org/POM/4.0.0" xmlns:xsi ="http://www.w3.org/2001/XMLSchema-instance" xsi:schemaLocation ="http://maven.apache.org/POM/4.0.0 http://maven.apache.org/xsd/maven-4.0.0.xsd" > <modelVersion > 4.0.0</modelVersion > <groupId > com.ooyhao.spring</groupId > <artifactId > spring-in-action-07-02</artifactId > <version > 1.0-SNAPSHOT</version > <packaging > war</packaging > <name > spring-in-action-07-02 Maven Webapp</name > <url > http://www.example.com</url > <properties > <project.build.sourceEncoding > UTF-8</project.build.sourceEncoding > <maven.compiler.source > 1.7</maven.compiler.source > <maven.compiler.target > 1.7</maven.compiler.target > </properties > <dependencies > <dependency > <groupId > junit</groupId > <artifactId > junit</artifactId > <version > 4.11</version > <scope > test</scope > </dependency > <dependency > <groupId > javax.servlet</groupId > <artifactId > javax.servlet-api</artifactId > <version > 4.0.1</version > </dependency > <dependency > <groupId > org.springframework</groupId > <artifactId > spring-webmvc</artifactId > <version > 5.1.9.RELEASE</version > </dependency > <dependency > <groupId > com.fasterxml.jackson.core</groupId > <artifactId > jackson-databind</artifactId > <version > 2.9.8</version > </dependency > <dependency > <groupId > com.fasterxml.jackson.core</groupId > <artifactId > jackson-annotations</artifactId > <version > 2.9.8</version > </dependency > <dependency > <groupId > junit</groupId > <artifactId > junit</artifactId > <version > 4.11</version > <scope > test</scope > </dependency > <dependency > <groupId > org.hibernate.validator</groupId > <artifactId > hibernate-validator</artifactId > <version > 6.1.0.Alpha3</version > </dependency > <dependency > <groupId > org.thymeleaf</groupId > <artifactId > thymeleaf</artifactId > <version > 3.0.11.RELEASE</version > </dependency > <dependency > <groupId > org.thymeleaf</groupId > <artifactId > thymeleaf-spring5</artifactId > <version > 3.0.9.RELEASE</version > </dependency > </dependencies > <build > <finalName > spring-in-action-07-02</finalName > <pluginManagement > <plugins > <plugin > <artifactId > maven-clean-plugin</artifactId > <version > 3.1.0</version > </plugin > <plugin > <artifactId > maven-resources-plugin</artifactId > <version > 3.0.2</version > </plugin > <plugin > <artifactId > maven-compiler-plugin</artifactId > <version > 3.8.0</version > </plugin > <plugin > <artifactId > maven-surefire-plugin</artifactId > <version > 2.22.1</version > </plugin > <plugin > <artifactId > maven-war-plugin</artifactId > <version > 3.2.2</version > </plugin > <plugin > <artifactId > maven-install-plugin</artifactId > <version > 2.5.2</version > </plugin > <plugin > <artifactId > maven-deploy-plugin</artifactId > <version > 2.8.2</version > </plugin > </plugins > </pluginManagement > </build > </project >
WebInit 1 2 3 4 5 6 7 8 9 10 11 12 13 14 15 16 17 18 19 20 21 22 23 24 25 26 27 28 29 30 31 32 33 34 35 36 37 38 39 40 41 42 public class WebInit extends AbstractAnnotationConfigDispatcherServletInitializer { @Override protected void customizeRegistration ( ServletRegistration.Dynamic registration) MultipartConfigElement configElement = new MultipartConfigElement( "D:\\data\\upload\\" , 52428800 , 52428800 , 0 ); registration.setMultipartConfig(configElement); } @Override protected Class<?>[] getRootConfigClasses() { return new Class[]{ RootConfig.class } ; } @Override protected Class<?>[] getServletConfigClasses() { return new Class[]{ ServletConfig.class } ; } @Override protected String[] getServletMappings() { return new String[]{ "/" }; } }
RootConfig.java 1 2 3 4 5 6 7 8 9 10 11 12 13 14 package com.ooyhao.spring.config;import org.springframework.context.annotation.ComponentScan;import org.springframework.context.annotation.Configuration;import org.springframework.context.annotation.FilterType;import org.springframework.web.servlet.config.annotation.EnableWebMvc;@ComponentScan (basePackages = "com.ooyhao.spring" , useDefaultFilters = true ,excludeFilters = { @ComponentScan .Filter(type = FilterType.ANNOTATION,classes = EnableWebMvc.class ) }) @Configuration public class RootConfig }
ServletConfig.java 1 2 3 4 5 6 7 8 9 10 11 12 13 14 15 16 17 18 19 20 21 22 23 24 25 26 27 28 29 30 31 32 33 34 35 36 37 38 39 40 41 42 43 44 45 46 47 48 49 50 51 52 53 54 55 56 57 58 59 60 61 62 63 package com.ooyhao.spring.config;import org.springframework.context.annotation.Bean;import org.springframework.context.annotation.ComponentScan;import org.springframework.context.annotation.Configuration;import org.springframework.web.multipart.MultipartResolver;import org.springframework.web.multipart.support.StandardServletMultipartResolver;import org.springframework.web.servlet.config.annotation.DefaultServletHandlerConfigurer;import org.springframework.web.servlet.config.annotation.EnableWebMvc;import org.springframework.web.servlet.config.annotation.WebMvcConfigurer;import org.thymeleaf.spring5.SpringTemplateEngine;import org.thymeleaf.spring5.templateresolver.SpringResourceTemplateResolver;import org.thymeleaf.spring5.view.ThymeleafViewResolver;import org.thymeleaf.templatemode.TemplateMode;@EnableWebMvc @ComponentScan (basePackages = "com.ooyhao.spring.**.controller" )@Configuration public class ServletConfig implements WebMvcConfigurer @Override public void configureDefaultServletHandling (DefaultServletHandlerConfigurer configurer) configurer.enable(); } @Bean public MultipartResolver multipartResolver () StandardServletMultipartResolver resolver = new StandardServletMultipartResolver(); return resolver; } @Bean public SpringResourceTemplateResolver templateResolver () SpringResourceTemplateResolver resolver = new SpringResourceTemplateResolver(); resolver.setCacheable(true ); resolver.setPrefix("/WEB-INF/templates/" ); resolver.setSuffix(".html" ); resolver.setCharacterEncoding("utf-8" ); resolver.setTemplateMode(TemplateMode.HTML); return resolver; } @Bean public SpringTemplateEngine templateEngine () SpringTemplateEngine engine = new SpringTemplateEngine(); engine.setEnableSpringELCompiler(true ); engine.setTemplateResolver(templateResolver()); return engine; } @Bean public ThymeleafViewResolver thymeleafViewResolver () ThymeleafViewResolver resolver = new ThymeleafViewResolver(); resolver.setTemplateEngine(templateEngine()); resolver.setCharacterEncoding("utf-8" ); return resolver; } }
IndexController 1 2 3 4 5 6 7 8 9 10 11 12 13 14 15 16 17 18 19 20 21 22 23 24 25 26 27 28 29 30 31 32 33 34 35 36 37 38 39 40 41 42 43 44 45 46 47 48 49 50 51 52 53 54 55 56 57 58 package com.ooyhao.spring.controller;import com.ooyhao.spring.bean.User;import com.ooyhao.spring.service.UserService;import org.springframework.beans.factory.annotation.Autowired;import org.springframework.stereotype.Controller;import org.springframework.ui.Model;import org.springframework.validation.BindingResult;import org.springframework.web.bind.annotation.GetMapping;import org.springframework.web.bind.annotation.PostMapping;import org.springframework.web.multipart.MultipartFile;import javax.validation.Valid;import java.io.File;import java.io.IOException;@Controller public class IndexController @Autowired private UserService userService; @GetMapping ("/" ) public String home () return "home" ; } @GetMapping ("/register" ) public String toRegister (Model model) model.addAttribute("user" ,new User()); return "register" ; } @PostMapping ("/register" ) public String register (@Valid User user, MultipartFile file, BindingResult bindingResult, Model model) throws IOException if (bindingResult.hasErrors()){ System.out.println("错误数目:" + bindingResult.getErrorCount()); model.addAttribute(user); return "register" ; } if (!file.isEmpty()){ file.transferTo(new File(System.currentTimeMillis()+file.getOriginalFilename().substring(file.getOriginalFilename().indexOf("." )))); } userService.saveUser(user); return "redirect:/registerSuccess" ; } @GetMapping ("/registerSuccess" ) public String registerSuccess () return "registerSuccess" ; } @GetMapping ("/registerFail" ) public String registerFail () return "registerFail" ; } }
效果
总结 至此,我们已经实现了使用纯Java配置的方式搭建了一个Springweb项目,并且通过配置的方式实现了文件上传。
处理异常 使用@ResponseStatus 我们看一下下面这个代码:
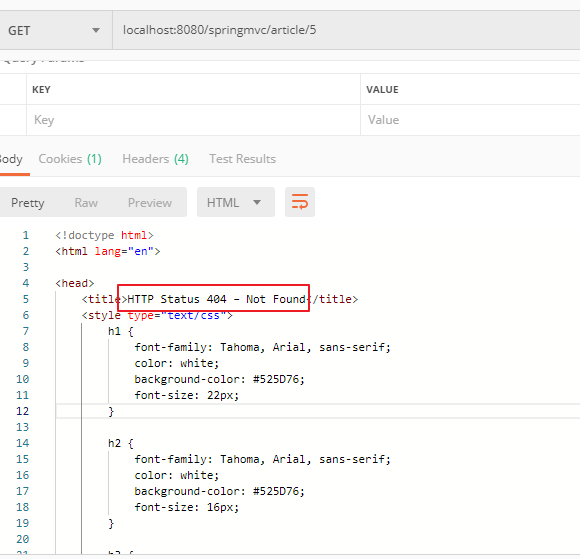
1 2 3 4 5 6 7 8 9 10 11 12 13 14 15 16 17 18 19 20 21 22 23 24 @GetMapping ("/article/{id}" )@ResponseBody public Article article (@PathVariable(value = "id" ) Integer id) Article article = null ; try { article = articleService.findArticleById(id); }catch (ArticleNotFoundException e){ e.printStackTrace(); } return article; } public Article findArticleById (Integer id) Article article = articles.get(id); if (article == null ){ throw new ArticleNotFoundException(); } return article; } public class ArticleNotFoundException extends RuntimeException
当我们访问时,如果findArticleById(id)查询出来为空时,按照当前的代码,会报500错误,但是正常情况我们希望抛出的是404.所以,在定义异常的时候,可以定义为:
1
2
@ResponseStatus (value = HttpStatus.NOT_FOUND,reason = "Not Found" )public class ArticleNotFoundException extends RuntimeException
我们看一下@ResponseStatus注解
1
2
3
4
5
6
7
8
9
10
11
12
13
@Target ({ElementType.TYPE, ElementType.METHOD})@Retention (RetentionPolicy.RUNTIME)@Documented public @interface ResponseStatus { @AliasFor ("code" ) HttpStatus value () default HttpStatus.INTERNAL_SERVER_ERROR ; @AliasFor ("value" ) HttpStatus code () default HttpStatus.INTERNAL_SERVER_ERROR ; String reason () default "" ; }
测试结果:
编写异常处理方法 如上一节中处理异常方法所示,在Handler中既包含正常业务逻辑代码,有包含处理异常的代码,那么有什么方法可以将异常处理代码剥离出来,Handler中只处理业务逻辑。
1
2
3
4
5
6
@GetMapping ("/article/{id}" )@ResponseBody public Article article (@PathVariable(value = "id" ) Integer id) Article article = articleService.findArticleById(id); return article; }
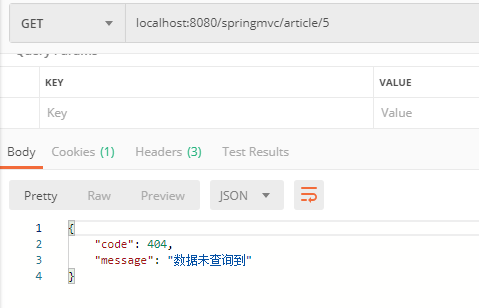
编写异常方法,即在当前controller中添加下列方法:
1
2
3
4
5
6
7
8
@ExceptionHandler (ArticleNotFoundException.class ) @ResponseBody public Map <String ,Object > handleNotFoundException () Map<String,Object> map = new HashMap<>(); map.put("code" ,404 ); map.put("message" ,"数据未查询到" ); return map; }
测试结果:
控制器通知处理异常 我们都知道,在正常的项目中,我们不可能将所有的处理方法都写在一个Controller中,为了区分业务模块,我们会将所有的controller方法划分在不同的controller类中。如果此时还是使用上述处理方法来处理异常的话,那么我们会发现很多相同的处理异常的代码。Spring3.2之后,有了统一的处理方案就是使用@ControllerAdvice。
https://www.cnblogs.com/yanggb/p/10859907.html
包含@ControllerAdvice的方法可以包含一个或多个如下类型的方法:
@ExceptionHandler标注的方法
@InitBinder标注的方法
@ModelAttribute标注的方法
@ExceptionHandler 1 2 3 4 5 6 7 8 9 10 11 @ControllerAdvice public class SpringControllerAdvice @ExceptionHandler (RuntimeException.class ) public ModelAndView runtimeExceptionHandler (RuntimeException e ) { e.printStackTrace(); return new ModelAndView("error" ); } }
@InitBandler 1 2 3 4 5 6 7 8 9 10 @ControllerAdvice public class SpringControllerAdvice @InitBinder public void globalInitBinder (WebDataBinder binder) binder.addCustomFormatter(new DateFormatter("yyyy-MM-dd" )); } }
@ModelAttribute 1 2 3 4 5 6 7 8 9 10 11 public class GlobalExceptionHandler @ModelAttribute public void addUser (Model model) model.addAttribute("msg" , "此处将键值对添加到全局,注解了@RequestMapping的方法都可以获得此键值对" ); } }
实例 1 2 3 4 5 6 7 8 9 10 11 12 13 14 15 16 17 18 19 20 21 22 23 24 25 26 27 @ControllerAdvice public class GlobalExceptionHandler private final static String ERROR_PAGE = "error" ; @ExceptionHandler (Exception.class ) public ModelAndView handle (Exception e ) { ModelAndView mv = new ModelAndView(); mv.addObject("message" , e.getMessage()); mv.setViewName(ERROR_PAGE); return mv; } @ModelAttribute public void addUser (Model model) model.addAttribute("msg" , "此处将键值对添加到全局,注解了@RequestMapping的方法都可以获得此键值对" ); } @InitBinder public void initBinder (WebDataBinder binder) } }
全局异常处理 1 2 3 4 5 6 7 8 9 10 11 12 13 14 15 16 17 18 19 @ControllerAdvice public class GlobalExceptionHandler @ExceptionHandler (ArticleNotFoundException.class ) @ResponseBody public Map <String ,Object > handleNotFoundException () { Map<String,Object> map = new HashMap<>(); map.put("code" ,404 ); map.put("message" ,"数据未查询到" ); return map; } }
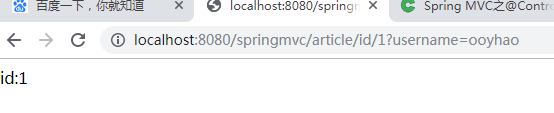
跨重定向请求传递数据 使用URL模板进行重定向 可以使用下列方式来传递参数
1 2 3 4 5 6 7 8 9 10 11 12 13 14 @GetMapping ("/article/{id}" ) public String article (@PathVariable(value = "id" ) Integer id, Model model) model.addAttribute("id" ,id); model.addAttribute("username" ,"ooyhao" ); return "redirect:/article/id/{id}" ; } @RequestMapping ("/article/id/{id}" )@ResponseBody public String articleId (@PathVariable(value = "id" ) Integer id) return "id:" +id; }
但是上述方式只能传递普通参数,当我们需要传递对象的时候,这种方式就无能为力了。此时我们可以使用Spring flash来传递。
代码如下:
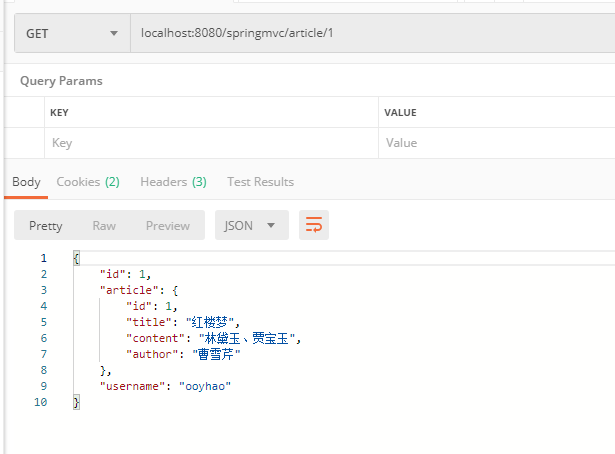
1 2 3 4 5 6 7 8 9 10 11 12 13 14 15 16 17 18 19 @GetMapping ("/article/{id}" )public String article (@PathVariable(value = "id" ) Integer id, RedirectAttributes attributes) Article article = articleService.findArticleById(id); attributes.addAttribute("id" ,id); attributes.addAttribute("username" ,"ooyhao" ); attributes.addFlashAttribute(article); return "redirect:/article/id/{id}" ; } @RequestMapping ("/article/id/{id}" )@ResponseBody public Map<String,Object> articleId (@PathVariable(value = "id" ) Integer id,String username, Model model) Map<String,Object> map = new HashMap<>(); map.put("id" ,id); map.put("username" ,username); map.put("article" ,model.asMap().get("article" )); return map; }
测试结果:
总结:本节实现了文件上传,异常处理,以及跨重定向请求传递参数。