
主从复制和哨兵模式
主从复制
主从复制介绍
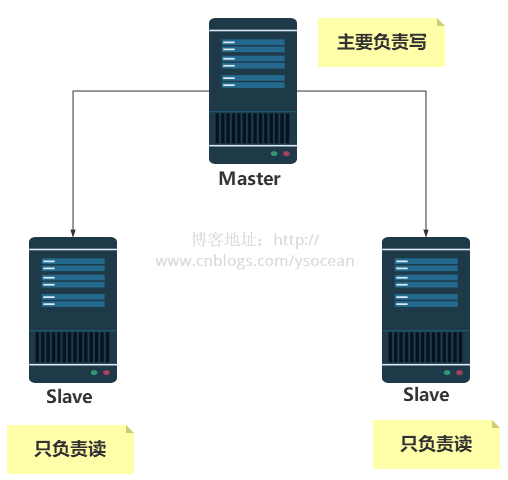
前面介绍Redis,我们都是在一台服务器上进行操作的,也就是说读和写以及备份操作都是在一台Redis服务器上进行的,那么随着项目访问量的增加,对Redis服务器的操作也越加频繁,虽然Redis读写速度都很快,但是一定程度上也会造成一定的延时,那么为了解决访问量大的问题,通常会采取的一种方式是主从架构Master/Slave,Master 以写为主,Slave 以读为主,Master 主节点更新后根据配置,自动同步到从机 Slave 节点。
接下来我们就来介绍如何进行主从架构的搭建。
PS:这里我是在一台机器上模拟多个Redis服务器,与实际生产环境中相比,基本配置都是一样,仅仅是IP地址和端口号变化。
搭建环境
复制Redis
将解压编译好的redis复制三份,并且重命名为 redis6379 redis6380 和 redis6381.
1 | [root@localhost ooyhao]# cp -r redis-5.0.7 redis6379 |
当然,我们也可以只将配置文件复制三份。可以起到同样的效果。
修改配置文件
将前面复制的三份redis文件进行配置文件【redis.conf】的修改。
修改为后台启动运行
1
2
3
4
5
6################################ GENERAL #####################################
By default Redis does not run as a daemon. Use 'yes' if you need it.
Note that Redis will write a pid file in /var/run/redis.pid when daemonized.、
daemonize no
daemonize yes表示修改redis以守护线程的方式启动(后台启动)
配置PID文件路径pidfile
1
2
3
4
5
6
7
8
9
10If a pid file is specified, Redis writes it where specified at startup
and removes it at exit.
When the server runs non daemonized, no pid file is created if none is
specified in the configuration. When the server is daemonized, the pid file
is used even if not specified, defaulting to "/var/run/redis.pid".
Creating a pid file is best effort: if Redis is not able to create it
nothing bad happens, the server will start and run normally.
pidfile /var/run/redis_6379.pid表示当redis作为守护线程运行的时候,它会把pid默认写到 /var/run/redis_6379.pid 文件中。
配置端口号port
1
2
3Accept connections on the specified port, default is 6379 (IANA #815344).
If port 0 is specified Redis will not listen on a TCP socket.
port 6379
配置log文件名
1
2
3
4Specify the log file name. Also the empty string can be used to force
Redis to log on the standard output. Note that if you use standard
output for logging but daemonize, logs will be sent to /dev/null
logfile "6379.log"
配置RDB文件名
1
2The filename where to dump the DB
dbfilename dump_6379.rdb
按照上面的方式配置redis6380和redis6381。只需要将相应的6379改为6380或6381即可。
启动服务
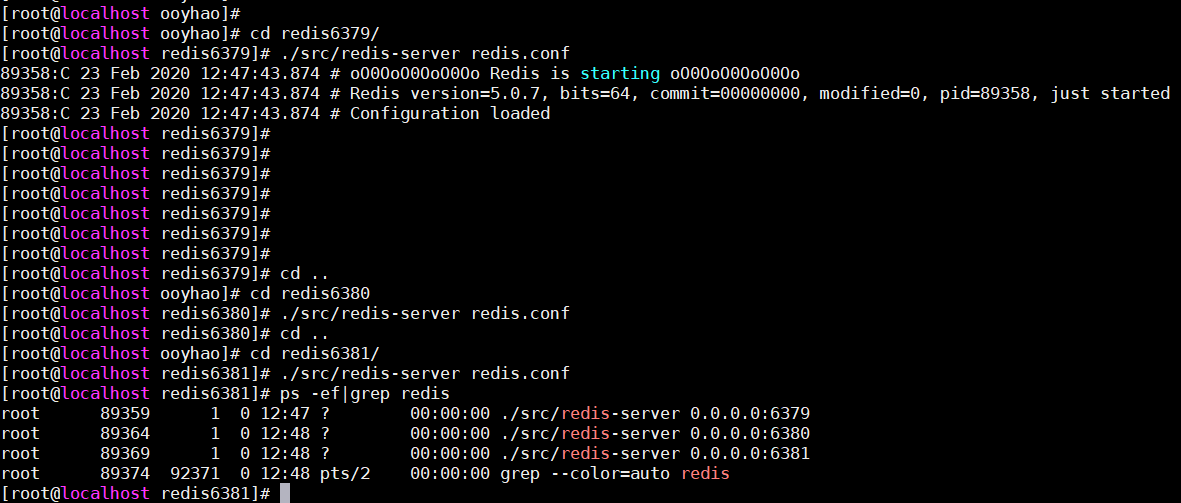
从上图可以看出,我们的三个redis服务已经正常启动。分别监听的端口是6379,6380和6381。
启动客户端
1 | [root@localhost src]# ./redis-cli -p 6379 |
利用上述命令,以启动三个不同的客户端,用来监听不同端口的服务。
配置主从关系
通过命令查询当前节点的角色
1
info / info replication
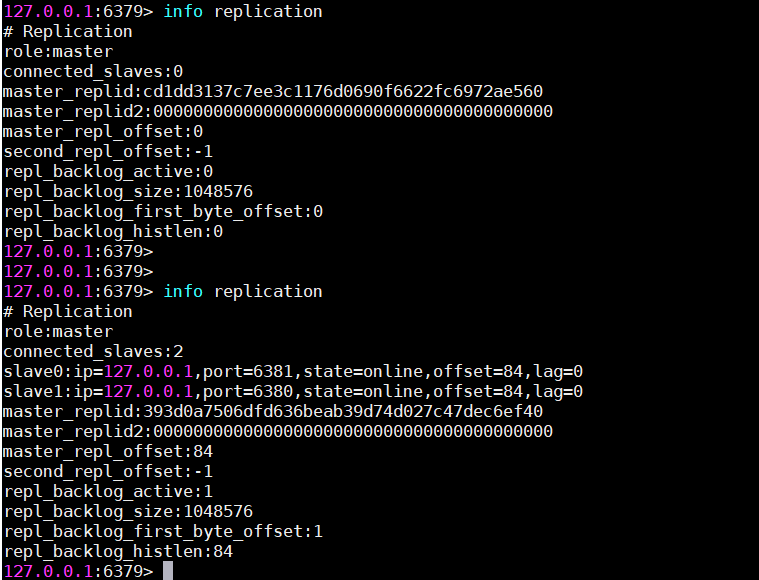
此时在三个不同的客户端执行
info replication命令,可以看到三个节点的角色(role)都是master。那么如何将6380和6381设置为6379的从节点(slave)呢?配置主从关系
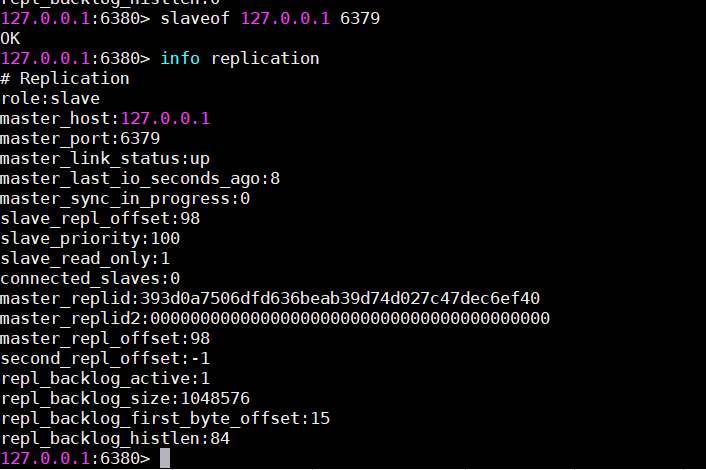
在6380和6381客户端,执行命令
slaveof 127.0.0.1 63791
2127.0.0.1:6380> slaveof 127.0.0.1 6379
OK此时我们再次使用
info replication命令查询三个节点的角色状态:6379:
6380:
6381:
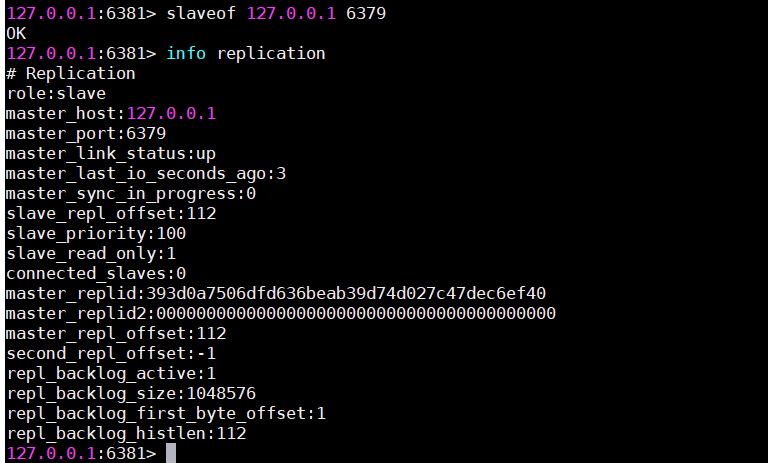
通过上述截图信息,可以看出此时主节点为 127.0.0.1 6379, 而从节点为127.0.0.1 6380 和 127.0.0.1 6381 。但是,通过命令设置的主从关系,一旦服务重启,那么角色关系就不复存在了。想要永久的保存这种关系。可以通过配置配置文件【redis.conf】来实现。如下:
1 | ################################ REPLICATION ################################# |
修改配置文件后,分别重启三个服务。执行info replication命令后,就可以看到效果了,并且这种方式不会因为服务重启而丢失主从关系。
测试主从复制关系
增量复制
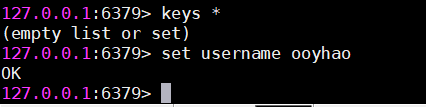
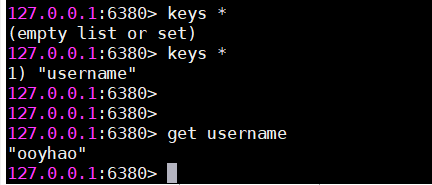
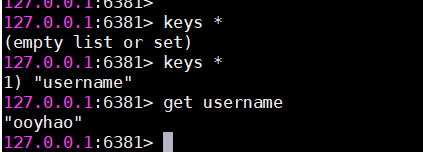
主节点执行命令set username ooyhao ,从节点是否可以获取到信息呢?
答案:肯定可以的。测试如下:
主节点执行set命令:
从节点获取keys:
全量复制
通过执行slaveof 127.0.0.1 6379 ,如果主节点6379以前还存在以下key-value数据。那么在执行命令之后,从节点是否可以将主节点的旧信息复制过来呢?
答案:可以的。测试过,不再截图。
主从读写分离
主节点可以执行写的命令,那么从节点是否可以执行写的命令呢?
答案:从节点默认情况下是不可以写入的,因为配置文件中配置了 replica-read-only

配置文件:
1 | You can configure a replica instance to accept writes or not. Writing against |
如果将其修改为no。从节点是可以写入数据的。
注意:即使是从节点的replica-read-only修改为no,从节点写入的数据,主节点也是同步不到的。如图
从节点写入数据:

主节点读取数据:

可以看出,即使我们将配置文件中的replica-read-only设置为no,从节点可以写入数据,但是主节点也是同步不到的。
主节点宕机
主节点Master宕机之后,两个节点的角色会发生变化吗?
答案:主节点挂掉之后,从节点的角色依旧不会发生变化。

主节点宕机后恢复
主节点宕机之后,马上启动主节点master。主节点是否还继续扮演master角色呢?
答案:主节点恢复之后,又恢复其主节点master角色。
复制原理
Redis的复制功能分为同步(sync)和命令传播(command propagate)两个操作。
旧版同步(旧数据同步)
当从节点发出slaveof命令,要求从服务器复制主服务器时,从服务器通过向主服务器发送sync命令来完成。该命令执行步骤:- 从服务器向主服务器发送
sync命令 - 收到
sync命令的主服务器执行bgsave命令,在后台生成一个 RDB 文件,并使用一个缓冲区记录从开始执行的所有写命令 - 当主服务器的
bgsave命令执行完毕时,主服务器会将bgsave命令生成的 RDB 文件发送给从服务器,从服务器接收此 RDB 文件,并将服务器状态更新为RDB文件记录的状态。 - 主服务器将缓冲区的所有写命令也发送给从服务器,从服务器执行相应命令。
- 从服务器向主服务器发送
命令传播
当同步操作完成之后,主服务器会进行相应的修改命令,这时候从服务器和主服务器状态就会不一致。为了让主服务器和从服务器保持状态一致,主服务器需要对从服务器执行命令传播操作,主服务器会将自己的写命令发送给从服务器执行。从服务器执行相应的命令之后,主从服务器状态继续保持一致。总结:通过同步操作以及命令传播功能,能够很好的保证了主从一致的特性。
但是我们考虑一个问题,如果从服务器在同步主服务器期间,突然断开了连接,而这时候主服务器进行了一些写操作,这时候从服务器恢复连接,如果我们在进行同步,那么就必须将主服务器重新生成一个RDB文件,然后给从服务器加载,这样虽然能够保证一致性,但是其实断开连接之前主从服务器状态是保持一致的,不一致的是从服务器断开连接,而主服务器执行了一些写命令,那么从服务器恢复连接后能不能只要断开连接的哪些写命令,而不是整个RDB快照呢?
同步操作其实是一个非常耗时的操作,主服务器需要先通过bgsave 命令来生成一个 RDB 文件,然后需要将该文件发送给从服务器,从服务器接收该文件之后,接着加载该文件,并且加载期间,从服务器是无法处理其他命令的。
为了解决这个问题,Redis从2.8版本之后,使用了新的同步命令 psync 来代替 sync 命令。该命令的部分重同步功能用于处理断线后重复制的效率问题。也就是说当从服务器在断线后重新连接主服务器时,主服务器只将断开连接后执行的写命令发送给从服务器,从服务器只需要接收并执行这些写命令即可保持主从一致。
主从复制的缺点
主从复制虽然解决了主节点的单点故障问题,但是由于所有的写操作都是在 Master 节点上操作,然后同步到 Slave 节点,那么同步就会有一定的延时,当系统很繁忙的时候,延时问题就会更加严重,而且会随着从节点slave的增多而愈加严重。因此我们还需要集群来进一步提升 redis 性能。
哨兵模式
哨兵模式介绍
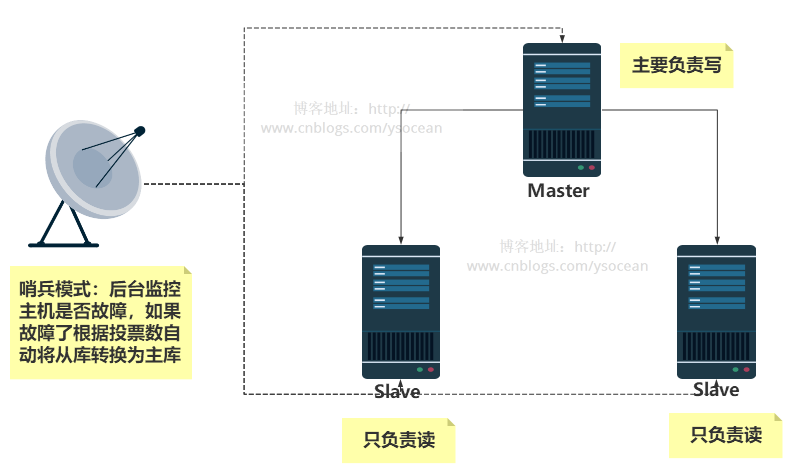
通过前面的配置,主节点Master 只有一个,一旦主节点挂掉之后,从节点没法担起主节点的任务,那么整个系统也无法运行。如果主节点挂掉之后,从节点能够自动变成主节点,那么问题就解决了,于是哨兵模式诞生了。哨兵模式就是不时地监控redis是否按照预期良好地运行(至少是保证主节点是存在的),若一台主机出现问题时,哨兵会自动将该主机下的某一个从机设置为新的主机,并让其他从机和新主机建立主从关系。
环境搭建
修改配置文件
配置文件是【sentinel.conf】,如果没有,则需要创建。注意:名字不能出错。
sentinel monitor 被监控机器的名字 ip port 得票数
1 | sentinel monitor <master-name> <ip> <redis-port> <quorum> |
分别配置【被监控机器的名字】,【IP地址】,【端口port】,【得票数】。
解释:sentinel 监控的master名字叫做mymaster,2 代表,当集群中有2个sentinel认为master挂了,才能真正认为该master已经不可用了。
但是测试时,只有一个哨兵sentinel。所以,这里设置为1.
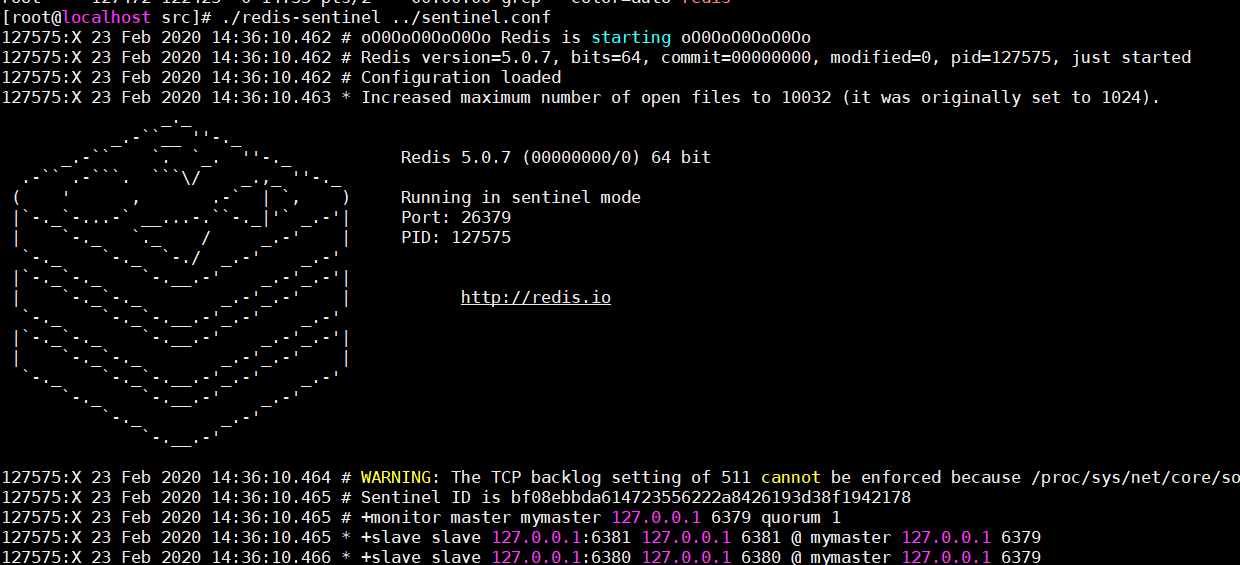
启动哨兵
使用./redis-sentinel ./sentinel.conf 命令来启动哨兵。启动效果如下:
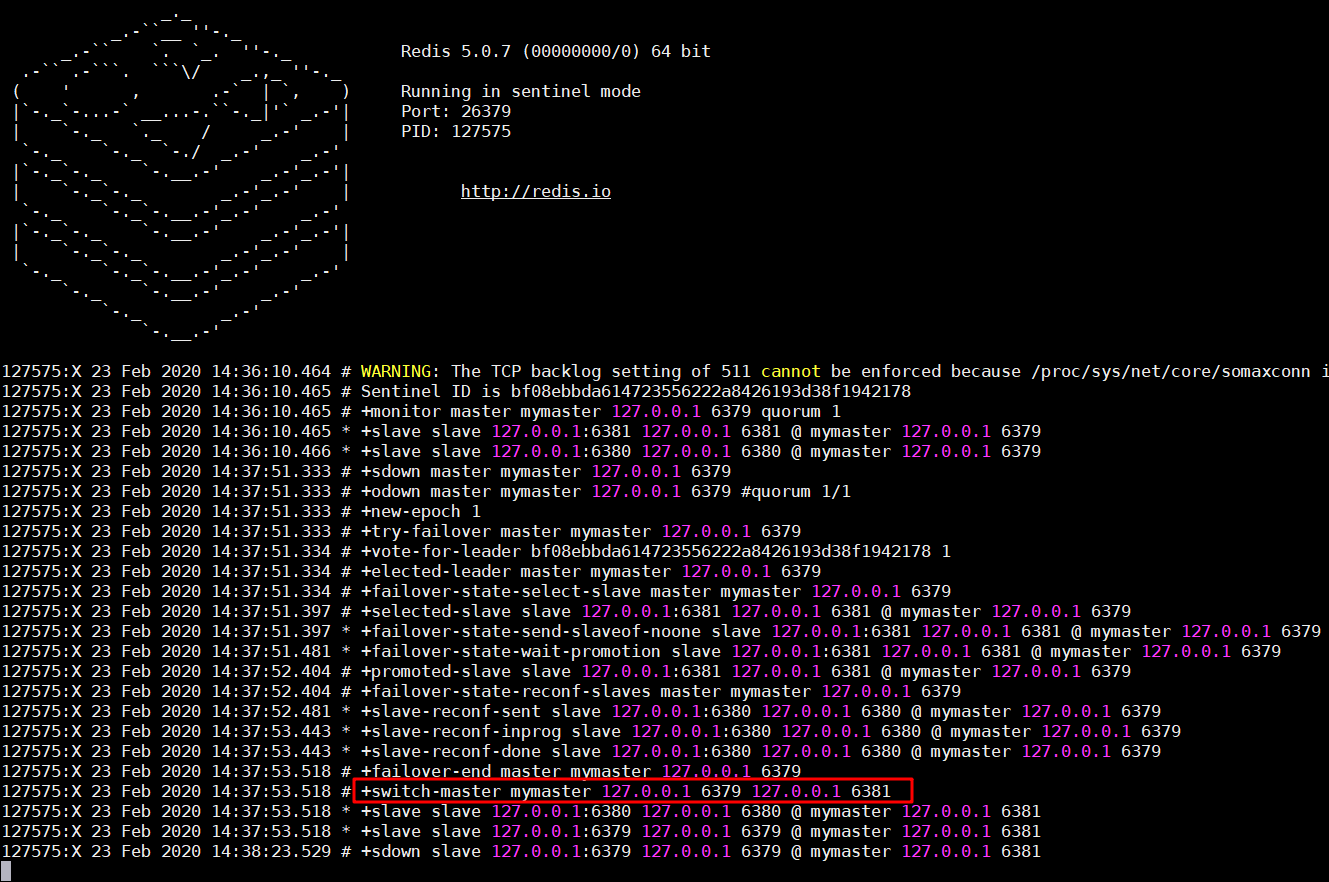
接下来,我们关闭主机6379,看各节点之间的主从关系变化。
redis后台服务器的开启命令:./redis-server redis.conf (在redis-server redis.conf安装目录下运行)
redis后台服务器的关闭命令:./redis-cli shutdown (同上)
1 | 127.0.0.1:6381> info replication |
通过日志可以看出,6379挂掉之后,redis内部进行了重新选举,6381上位成为master节点。即使6379重启之后,也只能是slave节点,无法直接成为master节点。
注意:哨兵模式也存在单点故障的问题,如果哨兵机器挂掉了,那么就无法进行监控了,解决办法就是哨兵也建立集群,redis哨兵模式也支持集群的。