SpringBoot基础
1.@Configuration,@ComponentScan,@Bean 实体类对象
1
2
3
4
5
6
@Data public class User private String username; private String password; private Integer age; }
模拟连接数据库取数据的DAO对象
1
2
3
4
5
6
7
8
9
10
11
12
13
14
public class UserDAO public List<User> queryUserList () List<User> result = new ArrayList<User>(); for (int i = 0 ; i < 10 ; i++) { User user = new User(); user.setUsername("username_" + i); user.setPassword("password_" + i); user.setAge(i + 1 ); result.add(user); } return result; } }
Service对象
1
2
3
4
5
6
7
8
9
10
11
@Service public class UserService @Autowired private UserDAO userDAO; public List<User> queryUserList () return this .userDAO.queryUserList(); } }
SpringConfig
1
2
3
4
5
6
7
8
9
@Configuration @ComponentScan (basePackages = "com.ooyhao.springboot.javaconfig" ) public class SpringConfig @Bean public UserDAO getUserDAO () return new UserDAO(); } }
注意:
SpringConfig.class原本是一个普通的class,但是加上@Configuration之后,相当于是之前spring的一个xml文件。
加上@ComponentScan之后,就相当于在spring xml文件配置了包扫描。而通过@Bean则相当于在xml文件中配置了一个Bean元素。所以springboot可以通过java程序配置来代替配置文件。
测试文件
1
2
3
4
5
6
7
8
9
10
11
12
13
14
15
16
17
public class Test public static void main (String[] args) AnnotationConfigApplicationContext context = new AnnotationConfigApplicationContext(SpringConfig.class ) ; UserService userService = context.getBean(UserService.class ) ; List<User> list = userService.queryUserList(); for (User user : list) { System.out.println(user); } context.destroy(); } }
注意:之前使用spring是使用ClassPathXmlApplitionContext对象来读取xml文件的。现在是使用AnnotationConfigApplicationContext来读取配置类的。注解配置。
2.@PropertySource读取配置文件 1 2 3 4 5 6 7 8 9 10 11 12 13 14 15 16 17 @Configuration @ComponentScan (basePackages = "com.ooyhao.springboot.javaconfig" ) @PropertySource (value={"classpath:db.properties" },ignoreResourceNotFound = true )public class SpringConfig @Value ("${jdbc.url}" ) private String url; @Bean public UserDAO getUserDAO () return new UserDAO(); } }
注意:使用注解,@PropertySource进行关联配置文件,如何需要配置多个配置文件的话,那就这样写,value={“classpath:db.properties”,”abc.properties”},如果配置文件不存在时,我们可以使用ignoreResourceNotFound属性进行配置,获取值就跟spring是一个样的,使用@Value注解获得值
3.通过使用注解配置的方式配置数据源 jdbc.properties文件
1 2 3 4 jdbc.driverClassName =com.mysql.jdbc.Driver jdbc.url =jdbc:mysql://127.0.0.1:3306/springboot?useUnicode=true&characterEncoding=utf8&autoReconnect=true&allowMultiQueries=true jdbc.username =root jdbc.password =123456
SpringConfig文件
1 2 3 4 5 6 7 8 9 10 11 12 13 14 15 16 17 18 19 20 21 22 23 24 25 26 27 28 29 30 31 32 33 34 35 36 37 38 39 40 41 42 43 44 @Configuration @ComponentScan (basePackages = "com.ooyhao.springboot.javaconfig" ) @PropertySource (value={"classpath:db.properties" },ignoreResourceNotFound = true )public class SpringConfig @Value ("${jdbc.driverClassName" ) private String driverClassName; @Value ("${jdbc.url}" ) private String url; @Value ("${jdbc.username}" ) private String username; @Value ("${jdbc.password}" ) private String password; @Bean public UserDAO getUserDAO () return new UserDAO(); } @Bean (destroyMethod = "close" ) public DataSource dataSource () BoneCPDataSource boneCPDataSource = new BoneCPDataSource(); boneCPDataSource.setDriverClass(driverClassName); boneCPDataSource.setJdbcUrl(url); boneCPDataSource.setUsername(username); boneCPDataSource.setPassword(password); boneCPDataSource.setIdleConnectionTestPeriodInMinutes(60 ); boneCPDataSource.setIdleMaxAgeInMinutes(30 ); boneCPDataSource.setMaxConnectionsPerPartition(100 ); boneCPDataSource.setMinConnectionsPerPartition(5 ); return boneCPDataSource; } }
测试文件
1 2 3 4 5 6 7 @Test public void test2 () AnnotationConfigApplicationContext applicationContext = new AnnotationConfigApplicationContext(SpringConfig.class ) ; DataSource bean = applicationContext.getBean(DataSource.class ) ; System.out.println(bean); }
小结:这里不用过多的解释,首先通过@Value注解读取properties文件中的值。然后通过在@Bean对象的方法中构建一个对象,通过对应的set方法将相应的参数设置进去即可。测试跟在xml文件中Bean标签和property标签一直。通过类的class文件获得。
4.Springboot第一个程序 springboot不是一个新的技术,只是在spring的基础之上集成后了很多开发技术,使得我们开发起来更加的轻松。
pom文件中需要添加
1 2 3 4 5 6 7 8 9 10 11 12 13 14 15 16 17 <parent > <groupId > org.springframework.boot</groupId > <artifactId > spring-boot-starter-parent</artifactId > <version > 1.5.2.RELEASE</version > </parent > <dependency > <groupId > org.springframework.boot</groupId > <artifactId > spring-boot-starter-web</artifactId > </dependency > <plugin > <groupId > org.springframework.boot</groupId > <artifactId > spring-boot-maven-plugin</artifactId > </plugin >
HelloApplication文件
1
2
3
4
5
6
7
8
9
10
11
12
13
14
15
16
@Controller @SpringBootApplication @Configuration public class HelloApplication @RequestMapping ("hello" ) @ResponseBody public String hello () return "hello world!" ; } public static void main (String[] args) SpringApplication.run(HelloApplication.class , args ) ; } }
说明:
1.@SpringBootApplication:springboot项目的核心注解,主要目的是开启自动配置。
2.@Configuration:这是一个spring的配置类
3.@Controller:标明这是一个springmvc的controller控制器
4.main方法:在main方法中启动一个应用,即:这个应用的入口。
效果图:
自定义banner
只需要在resources文件夹下新建一个banner.txt文件,再将自己喜欢的banner复制进去,重启程序即可看到效果。
取消Banner显示
1 2 3 4 5 6 7 8 public static void main (String[] args) SpringApplication springApplication = new SpringApplication(HelloApplication.class ) ; springApplication.setBannerMode(Banner.Mode.OFF); springApplication.run(args); }
5.springboot HelloWorld 1.创建一个maven工程 2.添加springboot的依赖 1 2 3 4 5 6 7 8 9 10 11 12 13 <parent > <groupId > org.springframework.boot</groupId > <artifactId > spring-boot-starter-parent</artifactId > <version > 1.5.9.RELEASE</version > </parent > <dependencies > <dependency > <groupId > org.springframework.boot</groupId > <artifactId > spring-boot-starter-web</artifactId > </dependency > </dependencies >
3.编写一个主程序 1 2 3 4 5 6 @SpringBootApplication public class HelloWorldMainApplication public static void main (String[] args) SpringApplication.run(HelloWorldMainApplication.class ,args ) ; } }
###4.编写一个controller
1 2 3 4 5 6 7 8 9 @Controller public class HelloController @RequestMapping (value = "/hello" ) @ResponseBody public String hello () return "hello world" ; } }
5.运行主程序测试 6.简化部署 (导入maven插件)
1 2 3 4 5 6 7 8 9 <build > <plugins > <plugin > <groupId > org.springframework.boot</groupId > <artifactId > spring-boot-maven-plugin</artifactId > </plugin > </plugins > </build >
将这个应用打成jar包,直接使用java -jar的命令进行执行。
6.Hello world探究 1.pom文件 1.导入的依赖 1 2 3 4 5 6 7 8 9 10 11 12 13 14 <parent > <groupId > org.springframework.boot</groupId > <artifactId > spring-boot-starter-parent</artifactId > <version > 1.5.2.RELEASE</version > </parent > 它的父项目是: <parent > <groupId > org.springframework.boot</groupId > <artifactId > spring-boot-dependencies</artifactId > <version > 1.5.2.RELEASE</version > <relativePath > ../../spring-boot-dependencies</relativePath > </parent > 它来真正管理spring boot应用里面的所有依赖版本。
Spring boot的版本仲裁中心。以后我们导入依赖默认是不需要写版本。(没有在dependencies里面管理的依赖自然需要声明版本号)
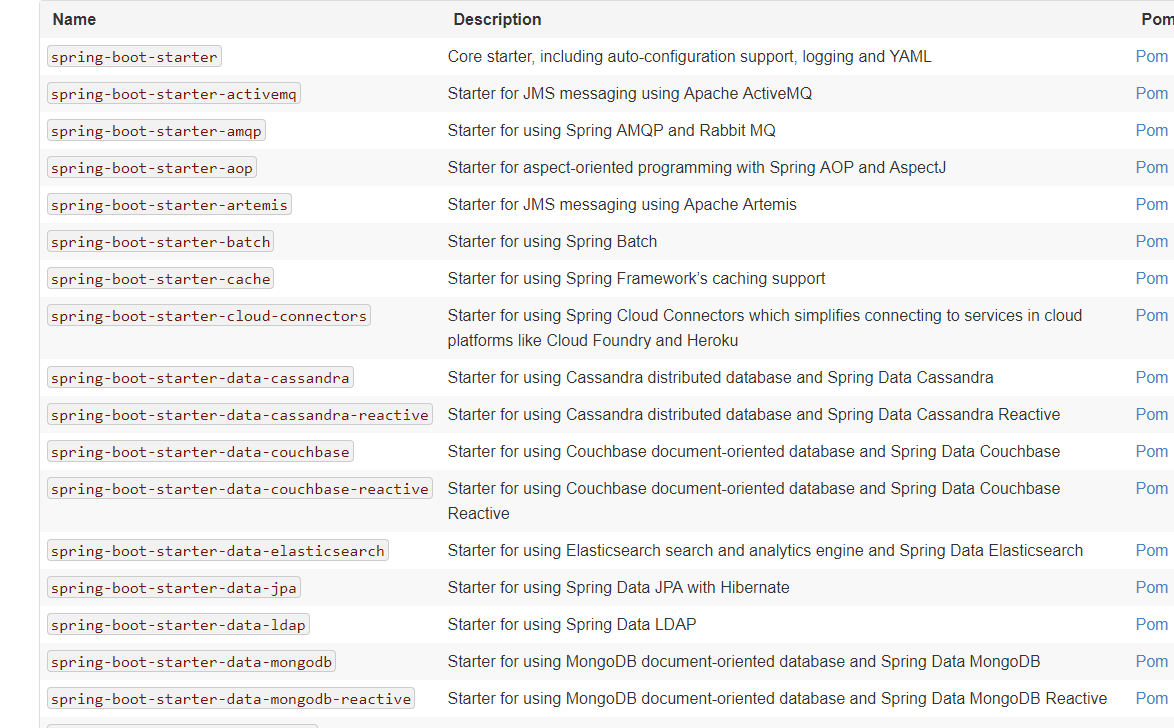
2.启动器 1 2 3 4 5 6 7 <dependencies > <dependency > <groupId > org.springframework.boot</groupId > <artifactId > spring-boot-starter-web</artifactId > </dependency > </dependencies >
spring-boot-starter web
spring-boot-starter:spring-boot场景启动器 。帮我们导入了web模块正常运行所依赖的组件。
spring boot 将所有的功能场景都抽取出来,做成一个个starter(启动器),只需要在项目里面引入这些starter相关场景的所有依赖都会导入进来。要用什么功能就导入什么场景的启动器。
2.主程序类,主入口类
@SpringBootApplication : Spring Boot应用,标注在某个类上,说明这个类是springboot的主配置类,springboot就应该运行这个类的main方法类启动springboot应用。
1 2 3 4 5 6 7 8 9 10 @Target (ElementType.TYPE)@Retention (RetentionPolicy.RUNTIME)@Documented @Inherited @SpringBootConfiguration @EnableAutoConfiguration @ComponentScan (excludeFilters = { @Filter (type = FilterType.CUSTOM, classes = TypeExcludeFilter.class ), @Filter (type = FilterType.CUSTOM, classes = AutoConfigurationExcludeFilter.class ) }) public @interface SpringBootApplication
@SpringBootConfiguration :sprintboot的配置类。
标注在某个类上,表示这是一个springboot的配置类。
@Configuration : 配置类上类标注这个注解;
配置类—– 配置文件。
@EnableAutoConfiguration :开启自动配置功能;
以前我们需要配置的东西,springboot帮我们自动配置;@EnableAutoConfiguration 告诉springboot开启自动配置功能。这样自动配置才能生效。
1
2
3
@AutoConfigurationPackage @Import (EnableAutoConfigurationImportSelector.class ) public @interface EnableAutoConfiguration
@AutoConfigurationPackage :自动配置包
@Import(AutoConfigurationPackages.Registrar.class) ;spring的底层注解,给容器中导入一个组件。
将主配置类,(@SpringBootApplication标注的类)的所在包及其子包里面的所有组件扫描到spring容器;