02.SpringBoot配置

SpringBoot基础配置

注意:默认都是先读取application.properties文件中的配置的。(即如果application.properties文件中有相对应的配置的话,就直接读取其中的。别的文件不会进行读取覆盖)

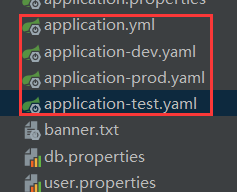
配置文件,分为 properties 和 yaml / yml

  1. yaml 配置是有序的,properties配置是无序的,
  2. 自定义的yaml目前暂时不支持使用注解直接注入到SpringBoot项目中。也就是只能使用 application.yaml

2.1 配置文件值注入

1.使用@ConfigurationProperties方式获取

类型安全注入

配置文件, application.yaml

1
2
3
4
5
6
7
8
9
10
11
12
13
14
15
16
17
18
19
stu:
username: admin
password: admin
enable: true
age: 23
person:
last-name: 张三
age: 23
boss: true
birth: 1996/03/24
dog:
dogName: 小白
dogAge: 1
maps: {code: 200, msg: success }
students:
- name: harry
age: 20
- name: tom
age: 23

JavaBean

1
2
3
4
5
6
7
8
9
10
11
12
13
14
15
16
17
18
19
/**
* 将配置文件中配置的属性的值映射到组件中
* @ConfigurationProperties 告诉SpringBoot将本类中的所有属性和配置文件中相
* 关的配置进行绑定
* prefix 配置文件中哪个下面的所有属性进行一一映射
* 只有这个组件是容器中的组件,才能使用容器提供的@ConfigurationProperties功能。
*/
@ConfigurationProperties(prefix = "person")
@Component
@Data
public class Person {
private String lastName;
private Integer age;
private Boolean boss;
private Date birth;
private Map<String,Object> maps;
private List<Student> students;
private Dog dog;
}

测试结果:(转为了JSON)

1
2
3
4
5
6
7
8
9
10
11
12
13
14
15
16
17
18
19
20
21
22
23
24
{
"age": 23,
"birth": 827596800000,
"boss": true,
"dog": {
"dogAge": 1,
"dogName": "小白"
},
"lastName": "张三",
"maps": {
"code": 200,
"msg": "success"
},
"students": [
{
"age": 20,
"name": "harry"
},
{
"age": 23,
"name": "tom"
}
]
}

我们可以导入配置文件处理器,以后编写配置文件就有提示了.没生效时,重新编译一下项目。

1
2
3
4
5
<dependency>
<groupId>org.springframework.boot</groupId>
<artifactId>spring-boot-configuration-processor</artifactId>
<optional>true</optional>
</dependency>

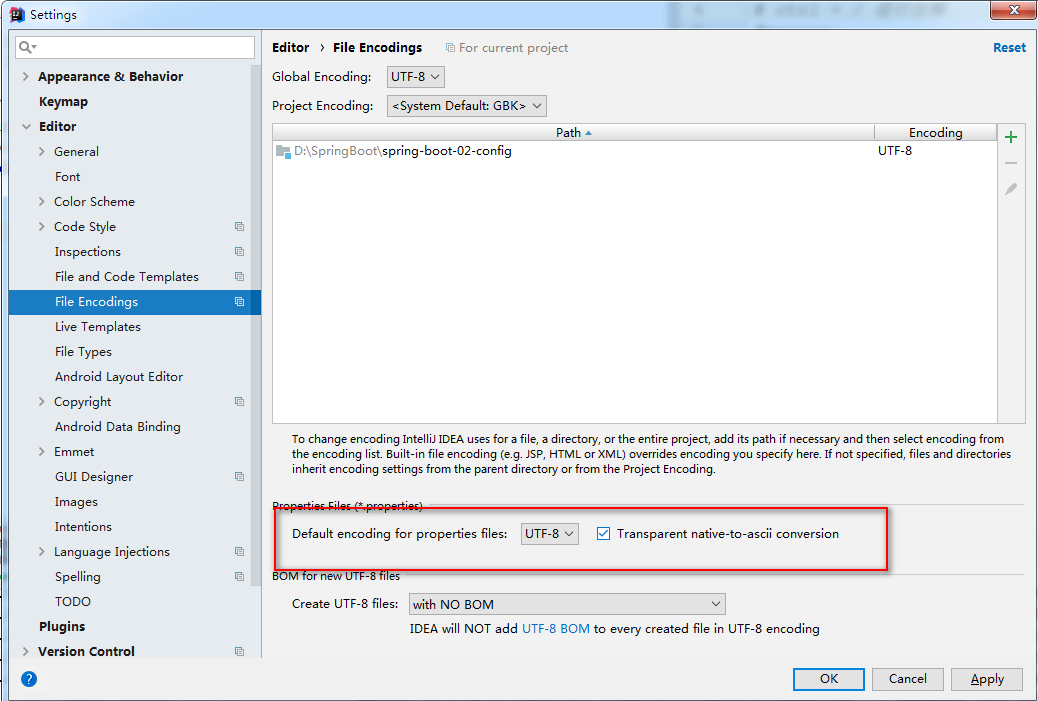
读取properties文件中获取中文时,如果出现了中文乱码,则需要进行相应的设置

1539423960883

2.只用@Value进行获取

@ConfigurationProperties @Value
功能 批量注入配置文件中的属性 一个个指定
松散绑定 支持(lastName与last-name) 不支持
SpEL 不支持 支持
JSR303数据校验 支持 不支持
复制类型封装(map) 支持 不支持

复杂类型封装不支持map但是支持list

配置文件yml与properties文件它们都能获得到值;

  • 如果只是在某个业务逻辑中需要获得以下配置文件中的某项值,使用@Value

  • 如果专门编写了一个javabean来和配置文件进行映射,我们就直接使用@ConfigurationProperties

3.配置文件数据校验

1
2
3
4
5
6
7
8
9
10
11
12
13
14
15
16
17
18
19
20
21
22
23
24
25
26
27
28
29
30
31
/**
* 将配置文件中配置的属性的值映射到组件中
* @ConfigurationProperties 告诉SpringBoot将本类中的所有属性和配置文件中相
* 关的配置进行绑定
* prefix 配置文件中哪个下面的所有属性进行一一映射
* 只有这个组件是容器中的组件,才能使用容器提供的@ConfigurationProperties功能。
*/
//@ConfigurationProperties(prefix = "person")
@Component
@Validated
public class Person {
/**
* <bean class="Person>
* <perperty name="lastName" value="字面量/${key}/#{SpEL}"></perperty>
* </bean>
*/
// @Value("${person.last-name}")
// @Email
private String lastName;
// @Value("#{10*2}")
private Integer age;
// @Value("false")
private Boolean boss;
private Date birth;

private Map<String,Object> maps;
private List<Object> lists;
private Dog dog;

public Person() {}
}

4.@PropertySource&@ImportResource

@PropertySource:加载指定的配置文件;

person.properties文件

1
2
3
4
5
6
7
8
9
person.last-name=李四
person.age=12
person.boss=false
person.birth=2018/12/12
person.maps.k1=v1
person.maps.k2=14
person.lists=a,b,c
person.dog.name=小狗
person.dog.age=12

person

1
2
3
4
5
6
7
8
9
10
11
12
13
14
15
@ConfigurationProperties(prefix = "person")
@PropertySource(value = {"classpath:person.properties"})
@Component
public class Person {
private String lastName;
private Integer age;
private Boolean boss;
private Date birth;

private Map<String,Object> maps;
private List<Object> lists;
private Dog dog;

public Person() {}
}

通过使用@PropertySource注解来指定配置文件,通过@ConfigurationProperties的prefix属性来指定前缀

@ImportResource:导入Spring的配置文件,让配置文件里面的内容生效

SpringBoot里面没有spring的配置文件,我们自己编写的配置文件,也不能自动识别;

想让Spring的配置文件生效,加载进来,@ImportResource标注在一个配置类上。

1
2
3
4
5
6
7
@ImportResource(locations = {"classpath:beans.xml"})//导入Spring的配置文件
@SpringBootApplication
public class SpringBoot02ConfigApplication {
public static void main(String[] args) {
SpringApplication.run(SpringBoot02ConfigApplication.class, args);
}
}

但是SpringBoot不推荐这样使用。

1
<bean id="helloService" class="com.ooyao.springboot.service.HelloService"></bean>

SpringBoot推荐给容器添加组件的方式:推荐使用全注解的方式

1.配置类===配置文件

2.使用@Bean给容器添加组件

使用@Configuration注解来标注一个配置类。用@Bean注解来标志一个组件。

1
2
3
4
5
6
7
8
9
@Configuration
public class MyAppConfig {

//将方法的返回值添加到容器中;容器中的组件默认的id就是方法名
@Bean
public HelloService helloService(){
return new HelloService();
}
}

2.2 配置文件占位符

1.随机数

1
2
3
4
5
${random.value}
${random.int}
${random.long}
${random.int(10)}
${random.int[1024,65536)}

2.占位符

1
2
3
4
5
6
7
8
person.last-name=张三${random.uuid}
person.age=${random.int}
person.boss=false
person.birth=2018/12/12
person.maps.k1=v1
person.maps.k2=14
person.lists=a,b,c
person.dog.name=${person.name:hi}_dog

2.3 Profile

Profile是Spring对不同环境提供不同配置功能的支持,可以通过激活,指定参数等方式快速切换环境。

1.多profile文件形式,

​ 格式:application-{profile}.properties/yml:application-dev.properties,application-prod.properties

1
spring.profiles.active=test

可以采用 properties文件或是 yaml 文件类型。 分别以 dev test prod 来代表三种不通的环境,将相应环境的配置信息放在相应的配置文件中。如果在三个配置文件中存在相同的配置信息,则可以统一放在application.yamlapplication.properties文件中。

2.多profile文档块模式

1
2
3
4
5
6
7
8
9
10
11
12
13
14
15
16
17
server:
port: 8081
spring:
profiles:
active: dev

---
server:
port: 8088
spring:
profiles: dev

---
server:
port: 8089
spring:
profiles: prod

上面最终监听的端口号是8088

使用spring.profiles来指定文档块的属性,使用spring.profiles.active指定读取哪个文档块
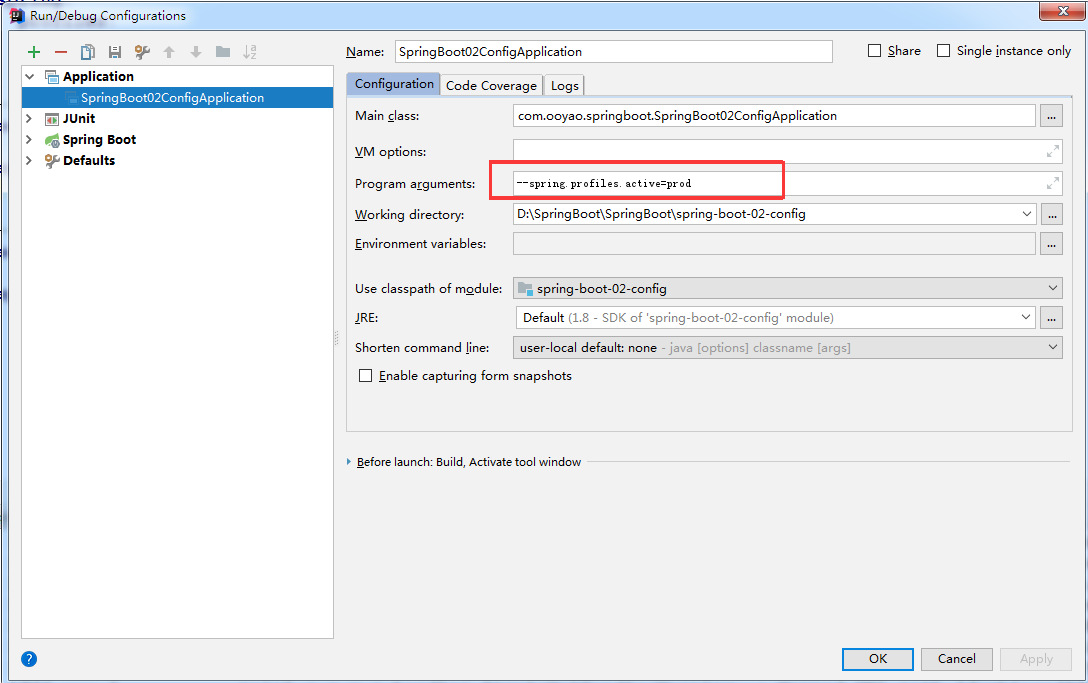
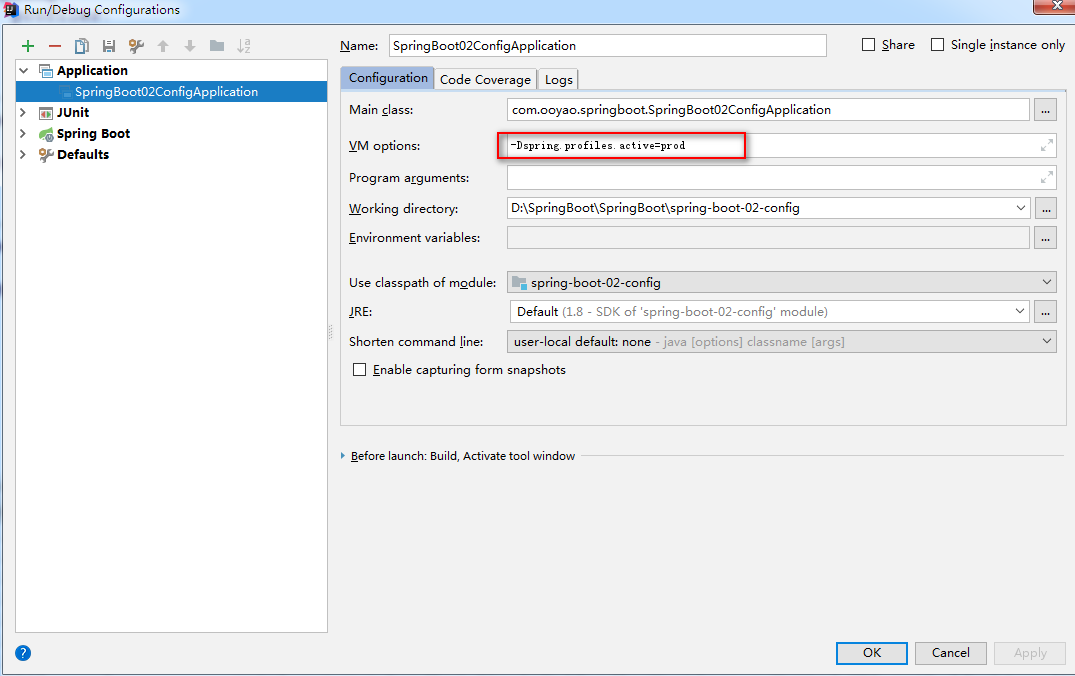
3.激活方式

​ -命令行:–spring.profiles.active=prod

1539436684796

img

-配置文件 spring.profiles.active=dev

1
spring.profiles.active=dev/prod

-jvm参数 -Dspring.profiles.active=dev

1539437378462

2.4配置文件加载位置

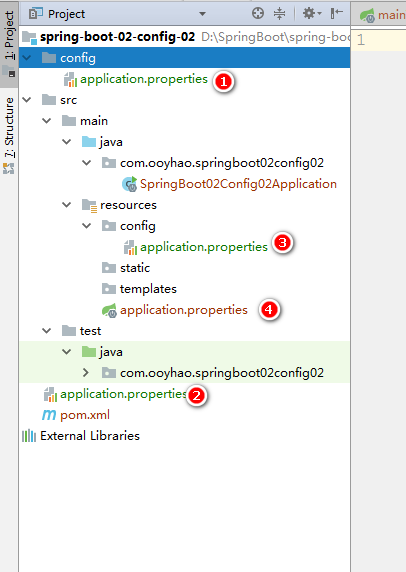
springboot启动会扫描以下位置的application.properties/yml文件作为springboot的默认配置文件

1
2
3
4
-file:./config/   当前项目的文件路径的config目录下				[1]
-file:./ 当前项目的文件路径下 [2]
-classpath:./config/ 当前项目的类路径下的config目录下 [3]
-classpath:./ 当前项目类路径下 [4]

以上是按照优先级从高到低的顺序,所有位置的文件都会被加载,高优先级配置内容会覆盖低优先级配置内容

如下图示

1539440373141

我们也可以通过配置spring.config.location来改变默认配置

1
2
在项目启动的时候可以指定配置文件的路径。使用下列命令。
java -jar *.jar --spring.config.location=G:/application.properties

1539442871351

项目打包好之后,我们可以使用命令行参数的形式,启动项目的时候来指定配置文件的新位置,指定配置文件和默认加载的这些配置文件会共同起作用,形成互补配置。

2.5外部配置加载顺序

1.命令行参数

所有的配置都可以在命令行上进行指定

1
java -jar spring-boot-02-config-02-0.0.1-SNAPSHOT.jar --server.port=8087  --server.context-path=/abc

多个配置用空格分开; –配置项=值

2.来自java:comp/env的JNDI属性

3.Java系统属性(System.getProperties())

4.操作系统环境变量

5.RandomValuePropertySource配置的random.*属性值

由jar包外向jar包内进行寻找;

优先加载带profile

6.jar包外部的application-{profile}.properties或application.yml(带spring.profile)配置文件

7.jar包内部的application-{profile}.properties或application.yml(带spring.profile)配置文件

再来加载不带profile

8.jar包外部的application.properties或application.yml(不带spring.profile)配置文件

9.jar包内部的application.properties或application.yml(不带spring.profile)配置文件

10.@Configuration注解类上的@PropertySource

11.通过SpringApplication.setDefaultProperties指定的默认属性

所有支持的配置加载来源;

参考官方文档

评论

Your browser is out-of-date!

Update your browser to view this website correctly. Update my browser now

×