Spring Boot之数据持久化
在我们实际项目中,数据的持久化是必不可少的一部分。那么,接下来我们来看一下使用SpringBoot的数据持久化操作的几种方式。分别是SpringBoot/Spring自带的JdbcTemplate,mybatis以及JPA。
下面我们就一一来使用一下:
JdbcTemplate CRUD 我们先使用JdbcTemplate来实现数据库操作的增删改查。
创建一个SpringBoot项目,并导入下列依赖:
1 2 3 4 5 6 7 8 9 10 11 12 13 14 15 16 17 18 19 20 21 22 <dependency > <groupId > org.springframework.boot</groupId > <artifactId > spring-boot-starter-jdbc</artifactId > </dependency > <dependency > <groupId > org.springframework.boot</groupId > <artifactId > spring-boot-starter-web</artifactId > </dependency > <dependency > <groupId > com.alibaba</groupId > <artifactId > druid-spring-boot-starter</artifactId > <version > 1.1.21</version > </dependency > <dependency > <groupId > org.projectlombok</groupId > <artifactId > lombok</artifactId > </dependency > <dependency > <groupId > mysql</groupId > <artifactId > mysql-connector-java</artifactId > <scope > runtime</scope > </dependency >
配置数据源:
1
2
3
4
5
spring.datasource.type =com.alibaba.druid.pool.DruidDataSource spring.datasource.username =root spring.datasource.password =root spring.datasource.driver-class-name =com.mysql.cj.jdbc.Driver spring.datasource.url =jdbc:mysql://127.0.0.1:3306/springboot?useUnicode=true&characterEncoding=utf8&serverTimezone=GMT
创建数据库表:
1
2
3
4
5
6
CREATE TABLE `user` ( `id` int (11 ) NOT NULL AUTO_INCREMENT, `username` varchar (64 ) DEFAULT NULL , `address` varchar (64 ) DEFAULT NULL , PRIMARY KEY (`id` ) ) ENGINE =InnoDB AUTO_INCREMENT=1 DEFAULT CHARSET =utf8;
实体类:
1
2
3
4
5
6
7
8
@Data @AllArgsConstructor @NoArgsConstructor public class User private Integer id; private String username; private String address; }
下面真正进入JdbcTemplate操作:
1
2
3
4
5
6
7
8
9
10
11
12
13
14
15
16
17
18
19
20
21
22
23
24
25
26
27
28
29
30
31
32
33
34
35
36
37
38
39
40
41
42
43
44
45
46
47
48
49
@Service public class UserService @Autowired private JdbcTemplate jdbcTemplate; public Integer addUser (User user) String insert = "insert into user (username,address) values (?,?)" ; int update = jdbcTemplate.update(insert, user.getUsername(), user.getAddress()); return update; } public Integer updateUsernameById (User user) String update = " update user set username = ? where id = ? " ; int rows = jdbcTemplate.update(update, user.getUsername(), user.getId()); return rows; } public Integer deleteUserById (Integer id) String delete = "delete from user where id = ?" ; int rows = jdbcTemplate.update(delete, id); return rows; } public List<User> findAllUsers () String query = " select * from user " ; List<User> users = jdbcTemplate.query(query, new RowMapper<User>() { @Override public User mapRow (ResultSet rs, int rowNum) throws SQLException int id = rs.getInt("id" ); String username = rs.getString("username" ); String address = rs.getString("address" ); User user = new User(id,username,address); return user; } }); return users; } }
可以直接将JdbcTemplate 从Spring容器中注入进来。说明:
使用JdbcTemplate,增删改都是使用update方法,查使用query方法。
查询时,如果实体属性名和数据库字段名是一一对应的,则可以使用BeanPropertyRowMapper对象。如果不是一一对应的,需要手动去实现RowMapper接口。
上面就已经简单的实现了,使用JdbcTemplate来操作数据库表的增删改查操作。
多数据源 下面我们来利用JdbcTemplate创建多数据源:
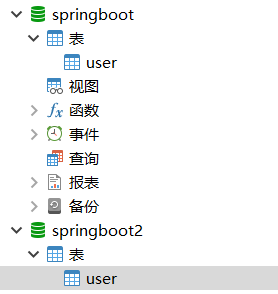
首先我们先再创建一个数据库,命名为springboot2.
创建项目并导入相应的依赖,至于依赖,是与前面一样的,这里不再赘述。我们需要在配置文件中配置两个数据源信息。
1
2
3
4
5
6
7
8
9
10
11
12
spring.datasource.one.type =com.alibaba.druid.pool.DruidDataSource spring.datasource.one.username =root spring.datasource.one.password =root spring.datasource.one.driver-class-name =com.mysql.cj.jdbc.Driver spring.datasource.one.url =jdbc:mysql://127.0.0.1:3306/springboot?useUnicode=true&characterEncoding=utf8&serverTimezone=GMT spring.datasource.two.type =com.alibaba.druid.pool.DruidDataSource spring.datasource.two.username =root spring.datasource.two.password =root spring.datasource.two.driver-class-name =com.mysql.cj.jdbc.Driver spring.datasource.two.url =jdbc:mysql://127.0.0.1:3306/springboot2?useUnicode=true&characterEncoding=utf8&serverTimezone=GMT
可以看出,我们是分别使用spring.datasource.one 和 spring.datasource.two 为前缀来配置两个数据源。
我们先声明两个数据源:
1
2
3
4
5
6
7
8
9
10
11
12
13
14
15
@Configuration public class DataSourceConfig @Bean @ConfigurationProperties (prefix = "spring.datasource.one" ) public DataSource dataSourceOne () DruidDataSource build = DruidDataSourceBuilder.create().build(); return build; } @Bean @ConfigurationProperties (prefix = "spring.datasource.two" ) public DataSource dataSourceTwo () DruidDataSource build = DruidDataSourceBuilder.create().build(); return build; } }
这里可以看出,我们使用了注解@ConfigurationProperties注解,来实现类型安全的注入。其次我们创建出两个不同JdbcTemplate实例并加入到Spring容器中:
1
2
3
4
5
6
7
8
9
10
11
12
@Configuration public class JdbcTemplateConfig @Bean public JdbcTemplate jdbcTemplateOne (@Qualifier("dataSourceOne" ) DataSource dataSource1) return new JdbcTemplate(dataSource1); } @Bean public JdbcTemplate jdbcTemplateTwo (@Qualifier("dataSourceTwo" ) DataSource dataSource2) return new JdbcTemplate(dataSource2); } }
至于实体类也与前面一样。我们看一下UserService:
1
2
3
4
5
6
7
8
9
10
11
12
13
14
15
16
17
18
19
20
21
@Service public class UserService @Autowired @Qualifier ("jdbcTemplateOne" ) private JdbcTemplate jdbcTemplateOne; @Autowired @Qualifier ("jdbcTemplateTwo" ) private JdbcTemplate jdbcTemplateTwo; public List<User> findAllUserByTemplateOne () return jdbcTemplateOne.query("select * from user " , new BeanPropertyRowMapper<>(User.class )) ; } public List<User> findAllUserByTemplateTwo () return jdbcTemplateTwo.query("select * from user" , new BeanPropertyRowMapper<>(User.class )) ; } }
我们通过测试,可以发现两个查询方法查到的数据是来自不同的数据库的。
Mybatis CRUD 依赖:
1 2 3 4 5 6 7 8 9 10 11 12 13 14 15 16 17 18 19 20 21 22 <dependency > <groupId > org.mybatis.spring.boot</groupId > <artifactId > mybatis-spring-boot-starter</artifactId > <version > 2.1.1</version > </dependency > <dependency > <groupId > com.alibaba</groupId > <artifactId > druid-spring-boot-starter</artifactId > <version > 1.1.21</version > </dependency > <dependency > <groupId > org.projectlombok</groupId > <artifactId > lombok</artifactId > </dependency > <dependency > <groupId > mysql</groupId > <artifactId > mysql-connector-java</artifactId > <scope > runtime</scope > </dependency >
与之前不同的是,这里需要导入Mybatis依赖。
配置文件:
1
2
3
4
5
6
7
spring.datasource.type =com.alibaba.druid.pool.DruidDataSource spring.datasource.username =root spring.datasource.password =root spring.datasource.driver-class-name =com.mysql.cj.jdbc.Driver spring.datasource.url =jdbc:mysql://127.0.0.1:3306/springboot?useUnicode=true&characterEncoding=utf8&serverTimezone=GMT mybatis.mapper-locations =classpath:mapper/**/*.xml
可以看出,我们这里指定了Mapper.xml文件的位置。
实体类与前面一致。下面我们看一下UserMapper接口.至于Mapper接口如何被扫描呢,可以在每一个Mapper接口上都用@Mapper 注解进行标识,也可以在主程序上用@MapperScan(basePackage=) 来统一扫描。
1 2 3 4 5 6 7 public interface UserMapper List<User> findAllUser () ; Integer insertUser (User user) ; Integer updateUsernameById (User user) ; Integer deleteUserById (Integer id) ; }
UserMapper.xml文件
1
2
3
4
5
6
7
8
9
10
11
12
13
14
15
16
17
18
<?xml version="1.0" encoding="UTF-8" ?> <!DOCTYPE mapper PUBLIC "-//mybatis.org//DTD Mapper 3.0//EN" "http://mybatis.org/dtd/mybatis-3-mapper.dtd" > <mapper namespace ="com.hao.springbootmybatis.mapper.UserMapper" > <insert id ="insertUser" > insert into user (username, address) values (#{username}, #{address}) </insert > <update id ="updateUsernameById" > update user set username = #{username} where id = #{id} </update > <delete id ="deleteUserById" > delete from user where id = #{id} </delete > <select id ="findAllUser" resultType ="com.hao.springbootmybatis.bean.User" > select * from user </select > </mapper >
主程序,使用@MapperScan注解标注:
1
2
3
4
5
6
7
@SpringBootApplication @MapperScan (basePackages = "com.hao.springbootmybatis.mapper" )public class SpringbootMybatisApplication public static void main (String[] args) SpringApplication.run(SpringbootMybatisApplication.class , args ) ; } }
测试代码:
1
2
3
4
5
6
7
8
9
10
11
12
13
14
15
16
17
18
19
20
21
22
23
24
25
26
27
28
29
30
31
32
33
34
@SpringBootTest class SpringbootMybatisApplicationTests @Autowired private UserMapper userMapper; @Test void testFindAllUser () List<User> allUser = userMapper.findAllUser(); for (User user : allUser){ System.out.println(user); } } @Test public void testInsertUser () User user = new User(); user.setUsername("孙悟空" ); user.setAddress("花果山" ); System.out.println(userMapper.insertUser(user)); } @Test public void testUpdateUsernameById () User user = new User(); user.setUsername("齐天大圣" ); user.setId(7 ); System.out.println(userMapper.updateUsernameById(user)); } @Test public void testDeleteUserById () System.out.println(userMapper.deleteUserById(6 )); } }
这里可以看出,我们通过配置文件指定了Mapper.xml文件是放在Resources中的,但是如果我们需要把xml文件放在与java文件同包下,则需要修改一下POM文件:
1 2 3 4 5 6 7 8 9 10 11 12 13 14 15 16 17 18 19 <build > <resources > <resource > <directory > src/main/java</directory > <includes > <include > **/*.xml</include > </includes > </resource > <resource > <directory > src/main/resources</directory > </resource > </resources > <plugins > <plugin > <groupId > org.springframework.boot</groupId > <artifactId > spring-boot-maven-plugin</artifactId > </plugin > </plugins > </build >
表示在执行打包编译的时候,将src/main/java包中的xml文件 和 src/main/resources目录下的文件都打包进去。
多数据源 Mybatis的动态数据源配置要比前面的JdbcTemplate的数据源配置麻烦一点。下面我们开始:
创建SpringBoot项目并引入依赖,与上面的普通项目一致,不再赘述。
总的项目结果如下:
我们先看一下配置文件。application.properties:
1
2
3
4
5
6
7
8
9
10
11
12
spring.datasource.one.type =com.alibaba.druid.pool.DruidDataSource spring.datasource.one.username =root spring.datasource.one.password =root spring.datasource.one.driver-class-name =com.mysql.cj.jdbc.Driver spring.datasource.one.url =jdbc:mysql://127.0.0.1:3306/springboot?useUnicode=true&characterEncoding=utf8&serverTimezone=GMT spring.datasource.two.type =com.alibaba.druid.pool.DruidDataSource spring.datasource.two.username =root spring.datasource.two.password =root spring.datasource.two.driver-class-name =com.mysql.cj.jdbc.Driver spring.datasource.two.url =jdbc:mysql://127.0.0.1:3306/springboot2?useUnicode=true&characterEncoding=utf8&serverTimezone=GMT
User实例这里也不再说,看一下数据源配置DataSourceConfig,与前面的JdbcTemplate也是大同小异的。
1
2
3
4
5
6
7
8
9
10
11
12
13
@Configuration public class DataSourceConfig @Bean @ConfigurationProperties (prefix = "spring.datasource.one" ) public DataSource dataSourceOne () return DruidDataSourceBuilder.create().build(); } @Bean @ConfigurationProperties (prefix = "spring.datasource.two" ) public DataSource dataSourceTwo () return DruidDataSourceBuilder.create().build(); } }
MybatisConfigOne:
1
2
3
4
5
6
7
8
9
10
11
12
13
14
15
16
17
18
19
20
21
22
23
24
25
26
27
@Configuration @MapperScan (basePackages = "com.hao.springbootmybatisdynamicdatasource.mapper1" ,sqlSessionFactoryRef = "sqlSessionFactory1" ) public class MybatisConfigOne @Resource (name = "dataSourceOne" ) DataSource dsOne; @Bean public SqlSessionFactory sqlSessionFactory1 () SqlSessionFactoryBean bean = new SqlSessionFactoryBean(); try { bean.setDataSource(dsOne); bean.setMapperLocations(new PathMatchingResourcePatternResolver().getResources("classpath:mapper/mapper1/**/*.xml" )); return bean.getObject(); } catch (Exception e) { e.printStackTrace(); } return null ; } @Bean public SqlSessionTemplate sqlSessionTemplate1 () return new SqlSessionTemplate(sqlSessionFactory1()); } }
MybatisConfigTwo:
1
2
3
4
5
6
7
8
9
10
11
12
13
14
15
16
17
18
19
20
21
22
23
24
25
26
@Configuration @MapperScan (basePackages = "com.hao.springbootmybatisdynamicdatasource.mapper2" ,sqlSessionFactoryRef = "sqlSessionFactory2" ) public class MybatisConfigTwo @Resource (name = "dataSourceTwo" ) DataSource dsTwo; @Bean public SqlSessionFactory sqlSessionFactory2 () SqlSessionFactoryBean bean = new SqlSessionFactoryBean(); try { bean.setDataSource(dsTwo); bean.setMapperLocations(new PathMatchingResourcePatternResolver().getResources("classpath:/mapper/mapper2/**/*.xml" )); return bean.getObject(); } catch (Exception e) { e.printStackTrace(); } return null ; } @Bean public SqlSessionTemplate sqlSessionTemplate2 () return new SqlSessionTemplate(sqlSessionFactory2()); } }
可以看到这两个Mybatis的配置文件中,分别需要指明自己的SqlSessionFactory需要获取哪里的mapper.xml文件,就是需要设置mapper.location。
然后就是创建的相应的UserMapper1.java 和 UserMapper1.xml, 以及 UserMapper2.java和UserMapper2.xml。
1
2
3
public interface UserMapper1 List<User> findAllUser () ; }
UserMapper1.xml
1
2
3
4
5
6
7
8
9
<?xml version="1.0" encoding="UTF-8" ?> <!DOCTYPE mapper PUBLIC "-//mybatis.org//DTD Mapper 3.0//EN" "http://mybatis.org/dtd/mybatis-3-mapper.dtd" > <mapper namespace ="com.hao.springbootmybatisdynamicdatasource.mapper1.UserMapper1" > <select id ="findAllUser" resultType ="com.hao.springbootmybatisdynamicdatasource.bean.User" > select * from user </select > </mapper >
UserMapper2.java 和 UserMapper2.xml文件只是文件名称不一样,其他类似,测试结果就可以发现,通过UserMapper1获取到的是数据库Springboot库中User表的数据。而通过UserMapper2获取到的是数据库SpringBoot2库中User表的数据。
注意: 如果我们的UserMapper.xml文件和UserMapper.java文件放在同一个目录下,我们只需要在maven中配置下面的就可以了,而不需在SqlSessionFactory中设置Mapper.location。
1 2 3 4 5 6 7 8 9 10 11 12 13 14 15 16 17 18 19 <build > <resources > <resource > <directory > src/main/java</directory > <includes > <include > **/*.xml</include > </includes > </resource > <resource > <directory > src/main/resources</directory > </resource > </resources > <plugins > <plugin > <groupId > org.springframework.boot</groupId > <artifactId > spring-boot-maven-plugin</artifactId > </plugin > </plugins > </build >
JPA 至于JPA的概念就不多介绍,JPA是一套标准,一套规范,而hibernate是JPA的实现。相当于说使用JPA实际上底层使用的还是hibernate。
CRUD 下面我们使用JPA来实现数据库表的增删改查。
引入依赖:
1 2 3 4 5 6 7 8 9 10 11 12 13 14 15 16 17 18 19 20 21 22 23 24 25 26 27 28 29 30 31 32 33 34 35 <dependencies > <dependency > <groupId > org.springframework.boot</groupId > <artifactId > spring-boot-starter-data-jpa</artifactId > </dependency > <dependency > <groupId > com.alibaba</groupId > <artifactId > druid-spring-boot-starter</artifactId > <version > 1.1.21</version > </dependency > <dependency > <groupId > org.projectlombok</groupId > <artifactId > lombok</artifactId > </dependency > <dependency > <groupId > mysql</groupId > <artifactId > mysql-connector-java</artifactId > <scope > runtime</scope > </dependency > <dependency > <groupId > org.springframework.boot</groupId > <artifactId > spring-boot-starter-test</artifactId > <scope > test</scope > <exclusions > <exclusion > <groupId > org.junit.vintage</groupId > <artifactId > junit-vintage-engine</artifactId > </exclusion > </exclusions > </dependency > </dependencies >
配置文件,application.properties:
1
2
3
4
5
6
7
8
9
10
11
12
spring.datasource.type =com.alibaba.druid.pool.DruidDataSource spring.datasource.username =root spring.datasource.password =root spring.datasource.driver-class-name =com.mysql.cj.jdbc.Driver spring.datasource.url =jdbc:mysql://127.0.0.1:3306/springboot?useUnicode=true&characterEncoding=utf8&serverTimezone=GMT spring.jpa.show-sql =true spring.jpa.database =mysql spring.jpa.database-platform =mysql spring.jpa.hibernate.ddl-auto =update spring.jpa.properties.hibernate.dialect =org.hibernate.dialect.MySQL57Dialect
这里不用自己先创建表,jpa会根据实体类自动去创建表。
1 2 3 4 5 6 7 8 9 10 @Entity (name = "t_book" )@Data public class Book @Id @GeneratedValue (strategy = GenerationType.IDENTITY) private Integer id; private String name; private String author; }
下面我们需要自定义一个接口,并实现JPA的JpaRepository:
1 public interface BookDao extends JpaRepository <Book ,Integer >
此时我们可以只需要实现接口,而不新增方法,就可以实现一些基本的增删改查了。因为Jpa中默认实现了一套基本的CRUD操作。
测试:
1
2
3
4
5
6
7
8
9
10
11
12
13
14
15
16
17
18
19
20
21
22
23
24
25
26
27
28
29
30
31
32
33
34
35
36
37
38
39
40
41
42
43
44
45
46
47
48
49
50
51
52
53
54
55
56
57
58
59
60
@SpringBootTest class SpringbootJpaApplicationTests @Autowired private BookDao bookDao; @Test void insert () Book book = new Book(); book.setName("三国演义" ); book.setAuthor("罗贯中" ); bookDao.save(book); } @Test void update () Book book = new Book(); book.setId(1 ); book.setName("三国演义" ); book.setAuthor("luoguanzhong" ); bookDao.saveAndFlush(book); } @Test void delete () bookDao.deleteById(1 ); } @Test void find1 () System.out.println(bookDao.findById(2 )); } @Test void find2 () List<Book> books = bookDao.findAll(Sort.by(Sort.Direction.DESC, "id" )); System.out.println(books); } @Test void find3 () Pageable pageable = PageRequest.of(0 ,2 ); Page<Book> bookPage = bookDao.findAll(pageable); long totalElements = bookPage.getTotalElements(); System.out.println("总记录数:" +totalElements); System.out.println("当前页记录数:" +bookPage.getNumberOfElements()); System.out.println("每页记录数:" +bookPage.getSize()); System.out.println("总页数:" +bookPage.getTotalPages()); System.out.println("查询结果:" +bookPage.getContent()); System.out.println("当前页(从0开始记录):" +bookPage.getNumber()); System.out.println("是否为首页:" +bookPage.isFirst()); System.out.println("是否为尾页:" +bookPage.isLast()); } }
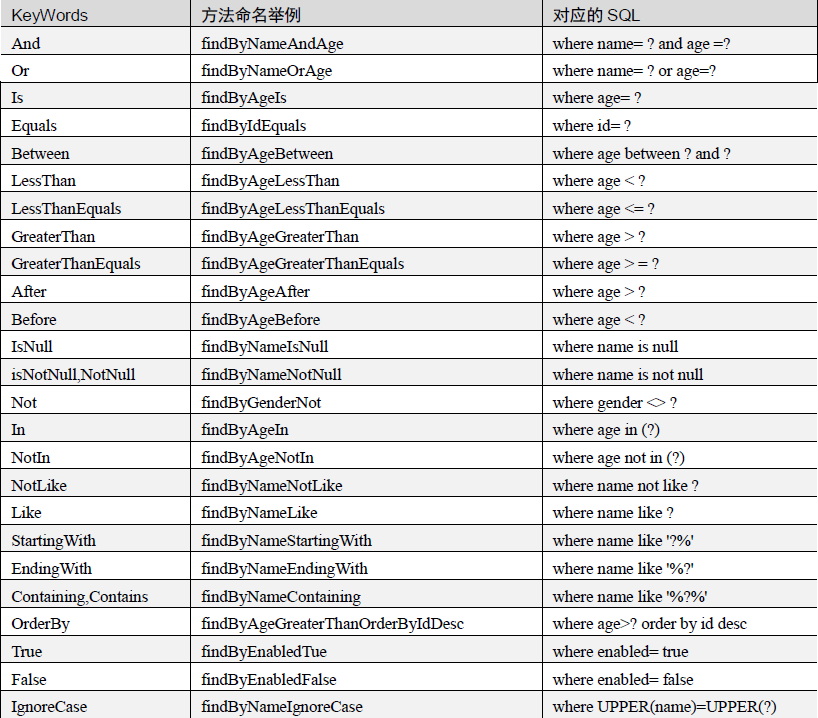
如上,这些方法都是默认就有的,那么如果我们需要自定义方法呢。可以按照下面的命名规范来设计方法,同样也可以不用写SQL,JPA会自动完成:
根据上面的规范,我们自定义几个:
1
2
3
4
5
public interface BookDao extends JpaRepository <Book ,Integer > Book findBookById (Integer id) ; List<Book> findBookByIdGreaterThan (Integer id) ; List<Book> findBookByIdLessThanOrNameContaining (Integer id, String name) ; }
解释:
findBookById. 顾名思义就是,根据id查询Book
findBookByIdGreaterThan. 查询Book信息,满足Id大于指定的值
findBookByIdLessThanOrNameContaining. 查询Book,满足Id小于指定值 或者 name包含指定字符串的。
自定义SQL
但是有一些需求可能简单实用方法命名查询就无法实现了,比如:查询Id最大的Book。此时,我们就需要自定义方法和SQL了。
1
2
@Query (nativeQuery = true , value = " select * from t_book where id = (select max(id) from t_book) " )Book getMaxIdBook () ;
说明一下,习惯实用原生的SQL的同学,如果不在``@Query中加入nativeQuery=true,会自动将其以JPQL来处理。所以,这里需要使用nativeQuery=true` 标注一下。
上面的是查询,下面我们看一下修改:
1
2
3
4
5
6
7
8
9
@Query (nativeQuery = true ,value = " insert into t_book (name,author) values (?1,?2) " )@Modifying @Transactional Integer addBook (String name,String author) ;@Query (nativeQuery = true ,value = " insert into t_book (name,author) values (:name,:author) " )@Modifying @Transactional Integer addBook2 (@Param("name" ) String name,@Param ("author" ) String author) ;
注意上面的注解,修改的时候需要加@Modifying 和 @Transactional 注解的。这里的修改包括 增加,修改,删除。
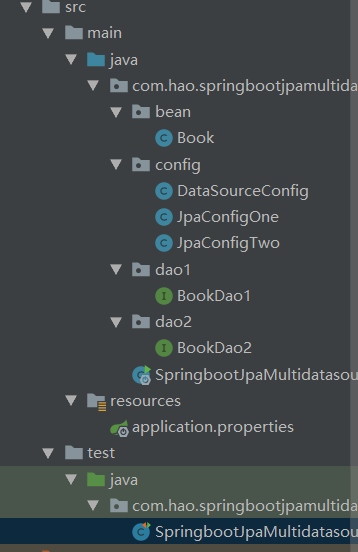
多数据 Spring Data JPA 整合多数据源。项目结构图如下:
依赖与前面一样,就不再赘述。配置文件如下:
1
2
3
4
5
6
7
8
9
10
11
12
13
14
15
16
17
18
spring.datasource.one.type =com.alibaba.druid.pool.DruidDataSource spring.datasource.one.username =root spring.datasource.one.password =root spring.datasource.one.driver-class-name =com.mysql.cj.jdbc.Driver spring.datasource.one.url =jdbc:mysql://127.0.0.1:3306/springboot?useUnicode=true&characterEncoding=utf8&serverTimezone=GMT spring.datasource.two.type =com.alibaba.druid.pool.DruidDataSource spring.datasource.two.username =root spring.datasource.two.password =root spring.datasource.two.driver-class-name =com.mysql.cj.jdbc.Driver spring.datasource.two.url =jdbc:mysql://127.0.0.1:3306/springboot2?useUnicode=true&characterEncoding=utf8&serverTimezone=GMT spring.jpa.properties.show-sql =true spring.jpa.properties.database =mysql spring.jpa.properties.database-platform =mysql spring.jpa.properties.hibernate.ddl-auto =update spring.jpa.properties.hibernate.dialect =org.hibernate.dialect.MySQL57Dialect
配置两个数据源:DataSourceConfig
1
2
3
4
5
6
7
8
9
10
11
12
13
14
15
16
@Configuration public class DataSourceConfig @Bean @Primary @ConfigurationProperties ("spring.datasource.one" ) public DataSource dataSourceOne () return DruidDataSourceBuilder.create().build(); } @Bean @ConfigurationProperties ("spring.datasource.two" ) public DataSource dataSourceTwo () return DruidDataSourceBuilder.create().build(); } }
JpaConfigOne,配置与之前的Mybatis配置大致类似:
1
2
3
4
5
6
7
8
9
10
11
12
13
14
15
16
17
18
19
20
21
22
23
24
25
26
27
@Configuration @EnableJpaRepositories (basePackages = "com.hao.springbootjpamultidatasource.dao1" ,entityManagerFactoryRef = "localContainerEntityManagerFactoryBean1" , transactionManagerRef = "platformTransactionManager1" ) public class JpaConfigOne @Autowired @Qualifier ("dataSourceOne" ) private DataSource dataSource; @Autowired private JpaProperties jpaProperties; @Bean @Primary public LocalContainerEntityManagerFactoryBean localContainerEntityManagerFactoryBean1 (EntityManagerFactoryBuilder builder) return builder.dataSource(dataSource) .properties(jpaProperties.getProperties()) .persistenceUnit("pu1" ) .packages("com.hao.springbootjpamultidatasource.bean" ) .build(); } @Bean public PlatformTransactionManager platformTransactionManager1 (EntityManagerFactoryBuilder builder) return new JpaTransactionManager(localContainerEntityManagerFactoryBean1(builder).getObject()); } }
JpaConfigTwo,配置信息:
1
2
3
4
5
6
7
8
9
10
11
12
13
14
15
16
17
18
19
20
21
22
23
24
25
26
@Configuration @EnableJpaRepositories (basePackages = "com.hao.springbootjpamultidatasource.dao2" ,entityManagerFactoryRef = "localContainerEntityManagerFactoryBean2" , transactionManagerRef = "platformTransactionManager2" ) public class JpaConfigTwo @Autowired @Qualifier ("dataSourceTwo" ) private DataSource dataSource; @Autowired private JpaProperties jpaProperties; @Bean public LocalContainerEntityManagerFactoryBean localContainerEntityManagerFactoryBean2 (EntityManagerFactoryBuilder builder) return builder.dataSource(dataSource) .properties(jpaProperties.getProperties()) .persistenceUnit("pu2" ) .packages("com.hao.springbootjpamultidatasource.bean" ) .build(); } @Bean public PlatformTransactionManager platformTransactionManager2 (EntityManagerFactoryBuilder builder) return new JpaTransactionManager(localContainerEntityManagerFactoryBean2(builder).getObject()); } }
上面的@EnableJpaRepositories注解指明了需要扫描哪个包。
实体类Book与前面的一样。下面声明两个Dao。
dao1/BookDao1:
1 public interface BookDao1 extends JpaRepository <Book , Integer >
dao1/BookDao2:
1 public interface BookDao2 extends JpaRepository <Book , Integer >
测试:
1
2
3
4
5
6
7
8
9
10
11
12
13
14
15
16
17
18
19
@SpringBootTest class SpringbootJpaMultidatasourceApplicationTests @Autowired private BookDao1 bookDao1; @Autowired private BookDao2 bookDao2; @Test void contextLoads () System.out.println(bookDao1.findAll()); } @Test void test () System.out.println(bookDao2.findAll()); } }
以上可以分别查询到两个数据库的表的信息。结果不再显示。